Ammar

What is Emacs

What is Emacs? An Overview Of Its Features

What is Emacs? Extensible Modular and Customizable System (Emacs) is a powerful, open-source text editor known for its extensive customization and functionality. 

Written primarily in C, it boasts portability across various operating systems including Linux, Windows, and macOS. This allows developers and users to maintain a consistent editing experience regardless of their platform.

Emacs uses Emacs Lisp, a dialect of Lisp embedded within the editor itself. This allows users and developers to extend Emacs’ functionality by writing custom code (Lisp programs) called packages. These packages can introduce new features, editing modes for specific programming languages, or even entirely new functionalities like project management or email integration.

Moreover, Emacs utilizes a modal editing system. Different editing modes, like programming language modes or text formatting modes, may have their own set of keybindings specific to their functionalities. This allows for context-sensitive editing and efficient operations within each mode.

What is Emacs and how does it work?

Mainly a text editor, but it does much more than just text editing. It offers a robust set of features for various text-based tasks, making it a favorite among programmers, writers, and power users. 

Feature Description
Solid Editing Foundation Emacs provides a comprehensive text editing environment for working with various file formats. It offers basic functionalities like insertion, deletion, copying, pasting, and searching of text.
Regular Expression PowerEmacs supports regular expressions, enabling powerful text manipulation and search capabilities.
Language-specific supportEmacs shines in its extensive support for programming languages. Dedicated editing modes exist for major languages like C++, Python, Java, and more. These modes offer features like: Syntax highlighting for improved readability. Code completion to suggest relevant code snippets as you type. Automatic indentation handling to maintain consistent code formatting. Language-specific functionalities like linting or debugging integration.
Beyond Programming Similar content-aware modes are available for markup languages (HTML, LaTeX) and other content types, providing context-specific editing assistance.
Project Management Emacs comes with built-in tools to help manage projects. You can navigate directories, open and manage multiple files simultaneously, and organize your codebase efficiently.
Version Control Integration Seamless integration with version control systems like Git or Subversion allows for tracking changes, version control operations, and collaboration directly within Emacs.
Customization Options Emacs allows extensive customization of its behavior. Users can modify key bindings, menu structures, and even the visual appearance of the editor to suit their preferences. 

Exploring the power of Emacs Lisp

Emacs Lisp (Elisp), a dialect of Lisp, is the fundamental part of Emacs’ extensibility. It empowers users and developers to extend the editor’s functionality by writing custom code (Lisp programs) called packages. These packages can introduce entirely new features, enhance existing functionalities, or automate repetitive tasks.

How Emacs Lisp extends functionality:

  • Access and Manipulation: Emacs Lisp provides access to Emacs’ internal state. Users can use Lisp code to interact with buffers (open files), manipulate text objects, define custom key bindings, and even create new editing modes.
  • Package Development: Emacs Lisp facilitates the creation of custom packages. These packages can contain functions, variables, and data structures specific to the desired functionality. Packages can be loaded and unloaded dynamically, allowing users to tailor their Emacs experience.
  • Integration with External Tools: Lisp allows for interaction with external programs and libraries. This enables features like compiling code within Emacs, running shell commands, or integrating with version control systems directly from the editor.

Advantages of Emacs

Known for its extensibility and power, offers a multitude of advantages for various users.

Extreme Customization Emacs stands out for its unparalleled level of customization. Users can tailor nearly every aspect of the editor to their preferences. This includes keybindings, menus, themes, and even core functionalities through Emacs Lisp. 
Extensibility Through PackagesEmacs’ extensibility via Emacs Lisp allows users to extend its capabilities through packages. This vast ecosystem of packages offers features for: Programming language support with syntax highlighting, code completion, and debugging integration. Text manipulation tools like advanced search and replace with regular expressions. Integration with external tools like version control systems, linters, and compilation tools.
Cross-Platform CompatibilityEmacs is written in C, making it highly portable. It runs seamlessly on various operating systems like Linux, Windows, and macOS. 
Powerful Built-in FunctionalitiesBeyond extensibility, Emacs includes a rich set of built-in features like: Regular expression support for complex text manipulation. Multi-buffer editing for managing multiple files simultaneously. Version control integration for seamless version tracking. A comprehensive help system for guidance and learning.
Open & Free Software Emacs is free and open-source software. This allows for community-driven development, continuous improvement, and access to the source code for deeper customization or contribution.
Mature & Stable PlatformEmacs has been actively developed for over 50 years, making it a mature and stable platform. It benefits from a large and active community that contributes to its ongoing development and ensures its continued relevance.

Emacs & its downsides?

Although quite powerful and beneficial, does have some considerable drawbacks:

Steep Learning CurveEmacs is famous for its complexity. It has a unique keybinding scheme and a vast array of features,  which can be intimidating for new users. 
Emacs LispIts customization power comes from Emacs Lisp, a dialect of Lisp.  While flexible, Lisp can be challenging to learn for those unfamiliar with the language family. This can make customizing Emacs a hurdle.
Non-standard KeybindingsEmacs keybindings differ from most other editors. This can be frustrating if you frequently switch between editors. While customization is possible, it can take time to  find a comfortable  scheme.
Scattered Documentation Emacs has a massive amount of functionality, and  the documentation can be scattered and sometimes outdated.
Potentially Resource IntensiveWhile generally efficient, Emacs can use more resources  on large files or with  heavy customization. This might not be ideal for low-powered machines.

What is a buffer in Emacs?

In Emacs, a buffer is a fundamental concept. It acts like a temporary holding area for text, not unlike tabs in a web browser. 

  • Core of Editing: The text you edit in Emacs resides in a buffer. Every time you open a file, it creates a buffer to store the file’s contents.
  • Beyond Files: Buffers aren’t limited to files. They can hold other kinds of text data, like directory listings (Dired mode) or the content of emails (message mode). There’s even a built-in scratch buffer for temporary text manipulation.
  • Multiple Buffers: You can have many buffers open at once, allowing you to switch between them easily. This is particularly useful for editing multiple files simultaneously.
  • Not Directly Shown: Buffers themselves aren’t directly displayed on the screen. They become visible only when displayed in a window. You can have one buffer displayed in a full window or split a window to show multiple buffers.
  • Context and State: Each buffer has associated information like its current file (if any), modification status, and active editing modes (major and minor modes). These details influence how Emacs behaves within that specific buffer.

In essence, buffers provide a powerful and flexible way to manage text in Emacs. 

Summary

Emacs offers a powerful core set of text editing features, coupled with intelligent content-aware editing modes and a variety of built-in functionalities. This comprehensive approach makes Emacs a versatile and extensible platform for various text-based workflows.

Emacs Lisp, its embedded scripting language, empowers users and developers to tailor the editor to their specific needs.

FAQs

Is Emacs good for programming?

Emacs is absolutely good for programming because of its powerful features, customization ability, and lightweight design. 

Who should use Emacs?

Emacs is a great fit for several types of users:

  • Programmers: As mentioned before, its customizability and powerful features for code editing make it ideal for programmers who want a tailored development environment.
  • Power Users: If you’re someone who likes to have a lot of control over your tools and wants a single application for various tasks beyond just coding, Emacs shines. You can use it for writing emails, managing files, browsing the web, and even more with extensions.
  • Those Who Value Efficiency: Emacs is lightweight and runs on most systems. This makes it a good choice for users who don’t want a resource-heavy IDE or who work on older machines.
Is Emacs good for beginners?

Emacs can be a good fit for beginners, but there are some pros and cons to consider:

Pros:

Low barrier to entry: Despite its reputation, Emacs can actually be used for basic text editing right out of the box. You don’t need to learn complex configurations to get started.

Customization potential: Even beginners can benefit from some basic customization. Emacs allows you to change things like fonts, colors, and keyboard shortcuts to make it more comfortable to use.

Strong community and resources: There’s a large and active Emacs community with plenty of tutorials, guides, and forums specifically geared towards beginners.

Cons:

Steeper learning curve: While basic use is possible, unlocking Emacs’ full potential requires learning its keybindings and potentially Emacs Lisp, which can be challenging for beginners.

Focus can be divided: The vast customizability can be overwhelming for new programmers who should be focusing on learning the fundamentals of coding itself.

What is Emacs? An Overview Of Its Features Read More »

Installing miniConda step-by-step Guide

Install Miniconda Linux – A Step By Step Guide 

To extract full use out of this bootstrap version of Anaconda, it’s important to learn how to install Miniconda Linux

Miniconda is a free, minimal installer for conda, a cross-platform package manager specifically designed for Python and its associated scientific computing libraries. 

Unlike Anaconda, the full-featured Python distribution, Miniconda focuses on providing the core functionality for environment and package management.

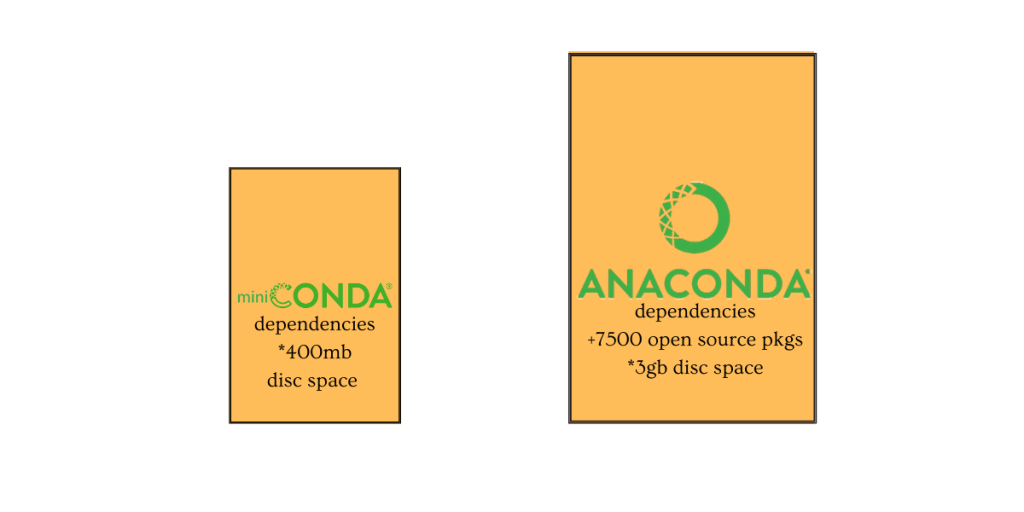
miniconda and anaconda dependencies comparison graph

Benefits of Miniconda Linux

Lightweight and Efficient Miniconda offers a significant advantage in terms of disk space. It only includes conda, Python, and a few essential dependencies, resulting in a much smaller download and installation footprint compared to Anaconda.
Granular Package ControlMiniconda allows users to install only the specific packages required for their project. This avoids unnecessary clutter and potential conflicts that can arise with pre-installed packages in Anaconda. 
Flexibility and CustomizationIt offers greater flexibility for creating isolated virtual environments. Each environment can have its own set of Python versions and packages, ensuring project-specific dependencies are met without affecting other projects on the system. This level of customization is crucial for managing complex workflows and maintaining compatibility across different projects.
Compatibility with Conda EcosystemAlthough it lacks pre-installed packages, Miniconda leverages the extensive conda package repository. Users can leverage the conda install command to access thousands of scientific, data analysis, and machine learning packages, providing a rich ecosystem for building diverse Python environments.
Integration with PipWhile conda excels at managing dependencies, Miniconda still integrates with pip, the standard Python package installer. Users can leverage pip for additional Python-specific packages that may not be available in the conda ecosystem.

Miniconda is compatible with Windows, macOS, and Linux. However, the steps of installation are different. This guide will exclusively focus on how to install Miniconda on a Linux system. 

Download & Install Miniconda Linux 

Before we get to the installation of Miniconda on Linux, it’s pertinent to understand the difference between a 64-bit and a 32-bit system. 

The core difference between 32-bit and 64-bit systems lies in how they handle data and memory. 

A 64-bit system can process data in 64-bit chunks because it has 64-bit memory addresses. This allows it to handle more complex calculations, work with significantly larger datasets faster, and utilise more random-access memory (RAM). 

On the other hand, a 32-bit system can only process data in 32-bit chunks at a time. This restricts its ability to handle complex calculations or work with large datasets efficiently due to limited addressable memory space. 

Almost all modern computers use a 64-bit system, but if you are unsure about your system’s architecture, search for it according to the instructions provided online. 

On a Linux system, simply typing the word ‘arch’ in the terminal will display the architecture of the system. Whereas on a Windows system, click on the Start button, then select Settings > System > About. On the right side of the pop up, under device specifications, look for System type. 

For e.g. , if you run arch and the output is x86_64, it means you have a 64-bit processor.

Feature32-bit System64-bit System
Data Handling32-bit chunks64-bit chunks
Memory Addressing (max)4GB18 Quintillion bytes
Suitability for Memory-intensive ApplicationsLowerHigher

Choosing between 64-bit and 32-bit:

In almost all modern scenarios, a 64-bit system is preferable. It offers superior performance, especially when dealing with large datasets or memory-intensive applications.

However, there might be a few rare cases where a 32-bit system could still be relevant:

  • Running very old software: Some extremely old software might only be compatible with 32-bit systems.
  • Limited system resources: If you have a very old computer with minimal RAM (less than 4GB), a 32-bit system might make better use of those resources.

For most users, though, a 64-bit system is the clear choice for its improved performance and wider software compatibility.

To download Miniconda for Linux, click here

Install Miniconda Linux – The complete process

After successfully downloading Miniconda, open the terminal window to install it. With the help of the terminal window, a user can interact with their system by typing different commands. 

Use the cd command to navigate to the directory where you want to download the installer. A directory is like a folder that holds files on your computer. The cd command lets you change between folders.

For example, if you want to download it to your Downloads directory, you might use:

cd ~/Downloads

Once downloaded (and optionally verified), use cd again to navigate to the directory containing the downloaded installer script (e.g., Miniconda3-latest-Linux-x86_64.sh).

Then, to run the script and initiate the installation, type:

bash filename.sh

Replace filename.sh with the actual filename of your downloaded installer. 

Follow the on-screen prompts during the installation and if you are unsure about any setting then accept the defaults. 

Installation prompts are messages that ask you questions during the setup process. Accepting the defaults means using the pre-selected options, which are usually fine for most users.

Install Miniconda Linux – Verifying installation

Here are two ways to verify if Miniconda is successfully installed on your Linux system:

Method 1: Using the conda command:

  1. Open a terminal window.
  2. Type the following command and press Enter:
conda list

If Miniconda is installed correctly, this command will display a list of currently installed packages in the base environment (which might be minimal by default with Miniconda).

Method 2: Checking the conda path:

  1. Open a terminal window.
  2. Type the following command and press Enter:
which conda

This command searches for the conda executable in your system PATH.

If Miniconda is installed and added to your PATH during installation (which might be the default behaviour), the command will output the directory path where the conda executable resides (e.g., /path/to/miniconda/bin/conda).

If neither of these methods work, it’s possible Miniconda wasn’t installed correctly or wasn’t added to your PATH.

You can try reinstalling Miniconda following the official instructions [anaconda miniconda download] and ensuring the PATH gets updated during installation.

How to install Miniconda on Linux? A summary

Installing Miniconda on Linux involves these key steps:

  1. Download the installer: Get the appropriate installer from the Anaconda website [anaconda miniconda download].
  2. Verify installer hash (optional): Download the checksum file (if offered) and use sha256sum or gpg to verify the installer hasn’t been corrupted.
  3. Run the installer script: Use bash to execute the downloaded installer script (e.g., bash filename.sh). Follow the on-screen prompts.
  4. Add conda to PATH (optional): Edit your shell configuration file (e.g., .bashrc) and add the Miniconda bin directory to your system PATH for easier access.

Optionally, you can verify the installation by running Conda list in a terminal window. This should display the installed packages if Miniconda is set up correctly.

Benefits of Conda 

Effortless environment managementCreate isolated environments for different projects, ensuring each one has the specific package versions it needs without conflicts.
Rich Package Ecosystem Access a vast repository of scientific packages for data analysis, machine learning, and more, all through the convenient Conda install command.
Seamless Dependency Resolution No more wrestling with dependency issues! Conda intelligently resolves dependencies between packages, ensuring everything works together smoothly.
Enhanced Reproducibility Easily recreate your project’s environment by sharing the Conda environment file, allowing others to run your code with identical dependencies.

Install Miniconda Linux – A Step By Step Guide  Read More »

Learn All About Microsoft Teams

Microsoft Teams User Guide: Learn All About Microsoft Teams Download, Usage, & Benefits

Teams is a cloud-based communication and collaboration platform developed by Microsoft. Designed for the modern workplace, it boosts features like chat, video conferencing, file storage, and application integration within a single interface. Let’s Explore more in this Microsoft Teams User Guide.

Benefits of Microsoft Teams App

Centralized CommunicationTeams offers a central hub for communication, fostering real-time chat interactions, group discussions via channels, and video conferencing capabilities.
Enhanced CollaborationFile sharing, co-authoring documents within integrated applications like Microsoft Office 365, and task management tools streamline teamwork and project execution.
Improved ProductivityCentralized information access, threaded conversations, and searchable chat history reduce communication overhead and enhance information retrieval.
Scalability and SecurityTeams offers secure communication channels with user access controls, making it suitable for organizations of all sizes.
Third-Party IntegrationAn extensive library of third-party applications integrate seamlessly with Teams, extending its functionality to cater to specific industry needs.

Uses of Microsoft Teams App

Virtual Meetings and Team HuddlesHost secure video conferences with screen sharing, presentations, and real-time captions for improved accessibility.
Project Management and CommunicationCreate project-specific channels for focused discussions, file sharing, and task allocation with integrated to-do lists.
Remote Work CollaborationFacilitate seamless communication and teamwork for geographically dispersed teams.
Customer Relationship ManagementEngage with clients directly through Teams calls and chats, facilitating personalized communication and support.
Internal Communication and Knowledge SharingCreate company-wide channels or private groups for announcements, discussions, and knowledge base creation.

Alternatives to Microsoft Teams

For the longest time possible, Microsoft teams single handedly dominated the world of digital communication. But with the passage of time, newer alternatives to Teams have made their way into the digital market. Some of the widely used options are:

  1. Slack: A popular chat-based collaboration platform offering integrations with various third-party tools.
  2. Google Meet: A video conferencing solution from Google tightly integrated with the G Suite of productivity applications.
  3. Zoom: A widely used video conferencing platform offering a free tier and paid plans with advanced features.
  4. Cisco Webex: A comprehensive collaboration suite encompassing video conferencing, file sharing, and project management functionalities.

Despite the availability of multiple options, Microsoft Teams offers a robust and versatile platform for communication and collaboration, making it a valuable tool for modern organizations.

Microsoft Teams Download

The process of downloading Microsoft Teams app on a desktop is different from that of downloading it on a mobile phone. 

Following is a user guide of Microsoft Teams that will simplify the process of downloading and using the Teams app. 

Microsoft Teams download on a mobile:

Install the Teams app from the Apple App Store for iOS devices or Google Play Store for Android devices.

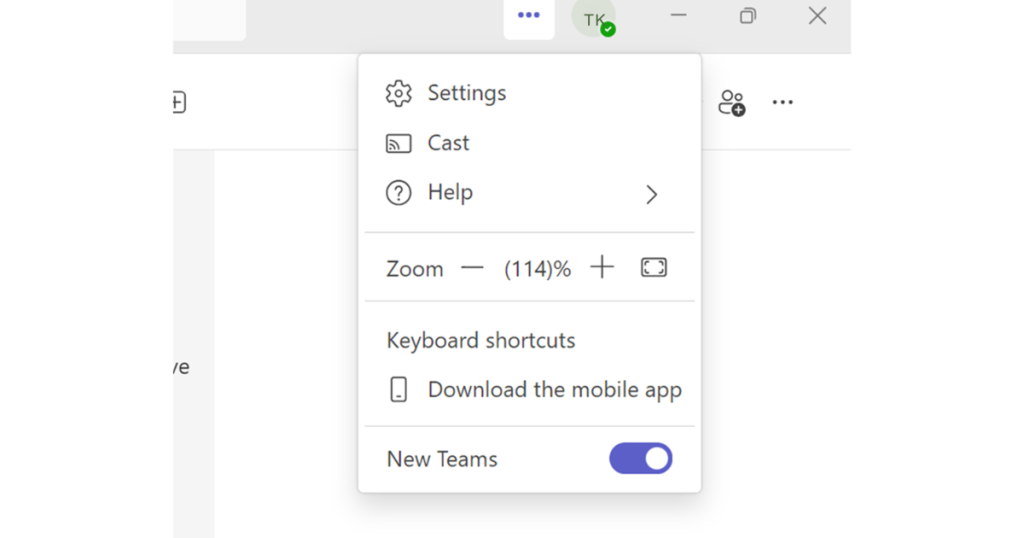
Click on the 3 dots from the drop down menu and then select ‘download the mobile app’ option. 

Mobile Device Download Option from MS Teams app

When you click on ‘download the mobile app’ option, a QR code will pop up. You need to scan it with your mobile phone after which it will automatically download the Microsoft Teams app on your phone. 

After successfully downloading you can use the app by signing into the app.

This concludes the process of downloading the Microsoft Teams app. 

How to create a channel or Team:

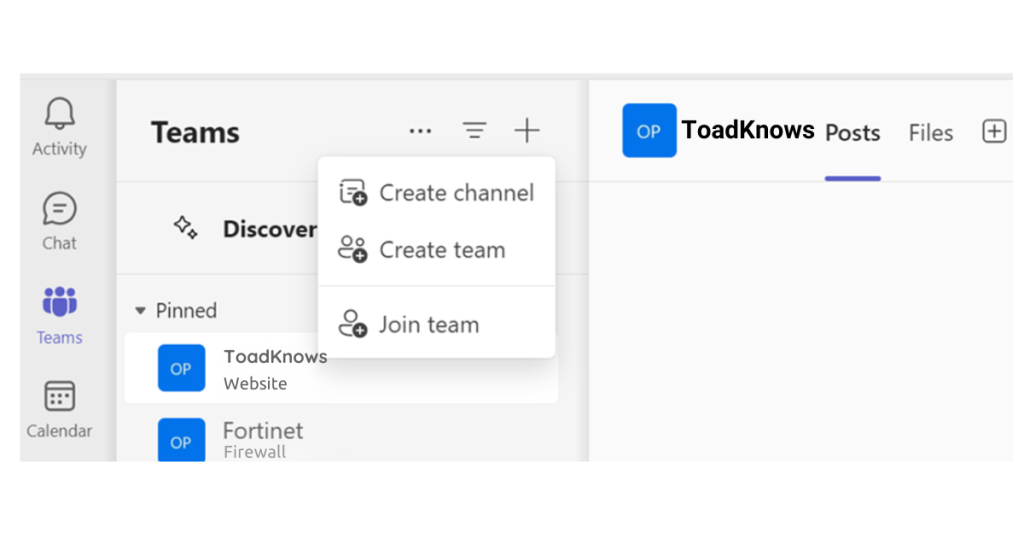
Creating a Team:

  1. Access Teams Menu: Launch the Microsoft Teams application and navigate to the “Teams” section on the left panel.
  2. Initiate Team Creation: Click the “+” icon located at the top of the teams list to initiate team creation.
Creating a Team from MS Teams app

  1. Team Type Selection: Choose between “From scratch” for a new team or “Build from a group” if leveraging an existing Office 365 group.
  2. Team Configuration: Define the team’s privacy level (Public for open access or Private for specific members) and provide a descriptive name. Optionally, include a team description for clarity.
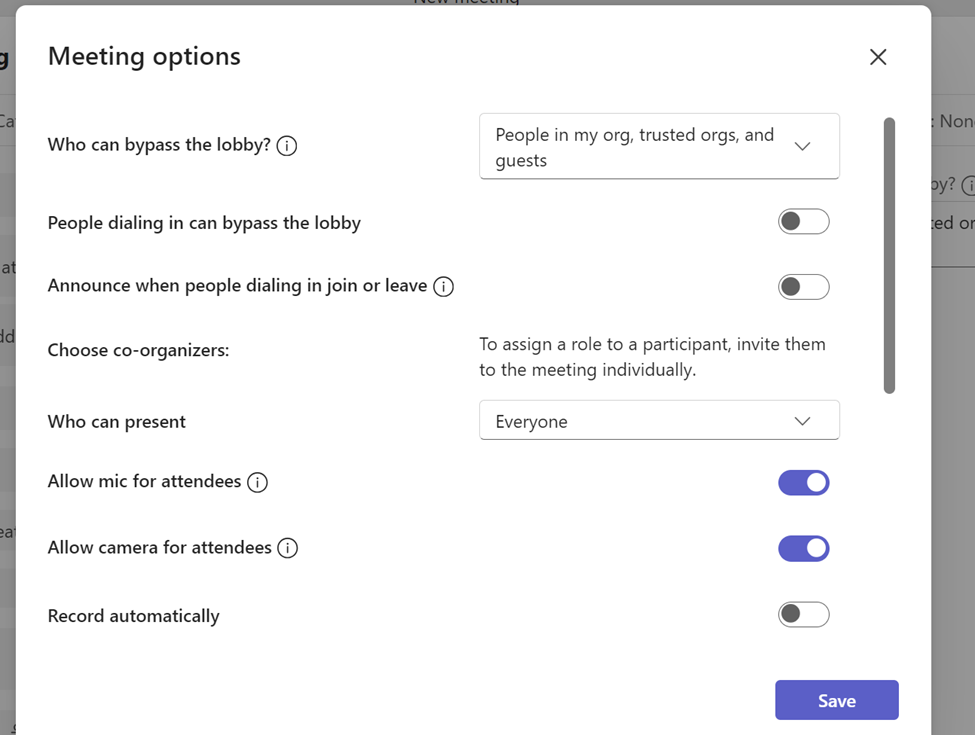
Teams meeting options

  1. Member Addition: Add members by typing their email addresses and selecting them from the search results.
  2. Team Creation: Once configuration is complete, click “Create” to establish the team.

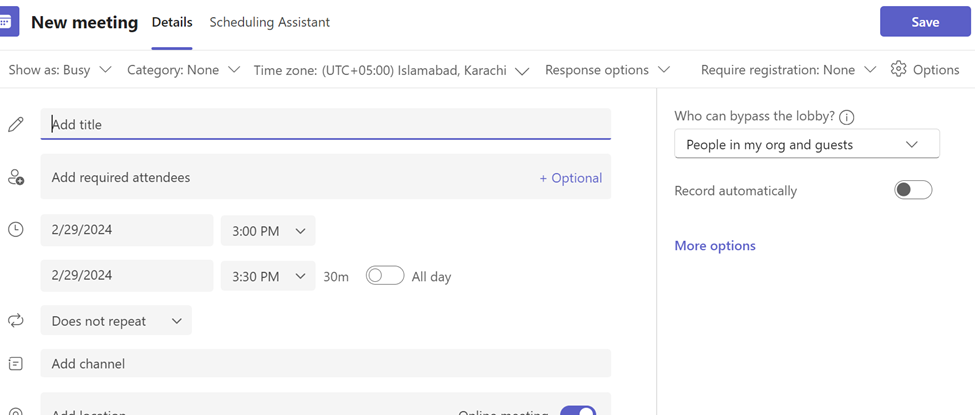
You can also create a new meeting through the calendar. 

New meeting schedule via Teams calendar

Click on the ‘new meeting’ icon on the top right corner of the screen. Following pop-up will appear after clicking on the ‘new meeting’ option:

Fill in the required details and save them to create a new team. 

Creating a Channel:

  1. Navigate to Target Team: Within the Teams application, select the desired team you want to add a channel to.
  2. Access Channel Management: Click the three dots “…” next to the team name and choose “Manage team” from the menu. Alternatively, right-click the team name and select “Manage team.”
  3. Channel Creation: Locate the “Channels” tab within the team management window and click the “+” icon to initiate channel creation.
  4. Channel Configuration: Provide a unique and descriptive name for the channel. Optionally, include a channel description outlining its purpose.
  5. Privacy Selection: Choose the channel’s privacy level (Standard for all team members or Private for designated members).
  6. Channel Creation: Click “Create” to establish the channel within the selected team.

Sharing OneDrive documents by Teams:

There are two primary methods for sharing OneDrive documents within Microsoft Teams:

Method 1: Sharing via Chat

  1. Initiate Chat: Navigate to the “Chat” section within the Teams application and open the chat conversation where you want to share the document.
  2. Attach the File: Click the “Attach” icon (paperclip symbol) located beneath the chat compose box.
  3. Select OneDrive Location: Choose “OneDrive” from the available options to access your OneDrive storage.
  4. Locate and Select File: Browse your OneDrive folders and select the document you intend to share.
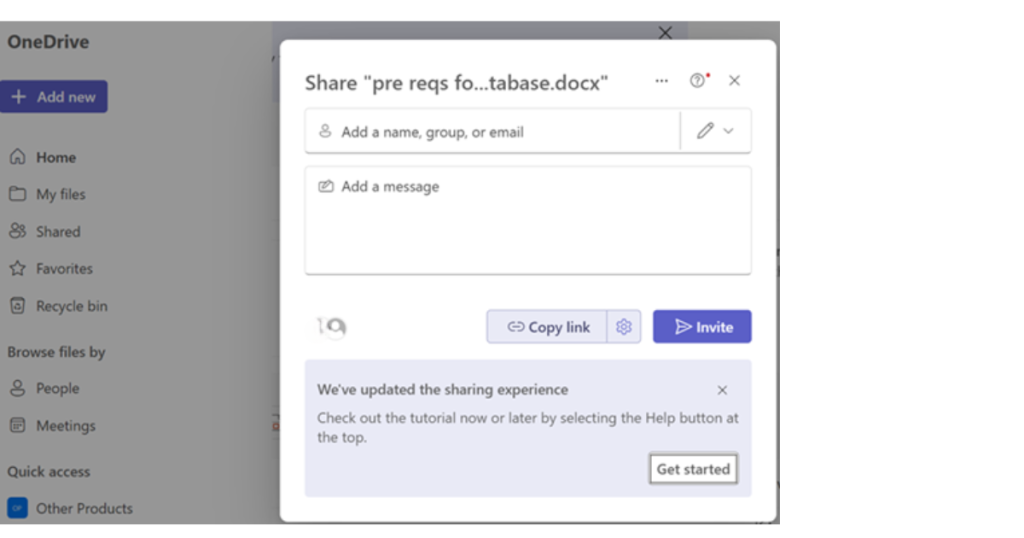
OneDrive document sharing via Teams

  1. Sharing Options (Optional): Click the three dots “…” next to the file name to access sharing options. Here, you can choose to either “Share” (providing view/edit access based on your OneDrive settings) or “Open in Teams” (opening the document within the Teams chat for real-time collaboration).
  2. Send the Chat: Once you’ve selected the desired file and sharing option, click the “Send” button to share the document within the chat conversation.

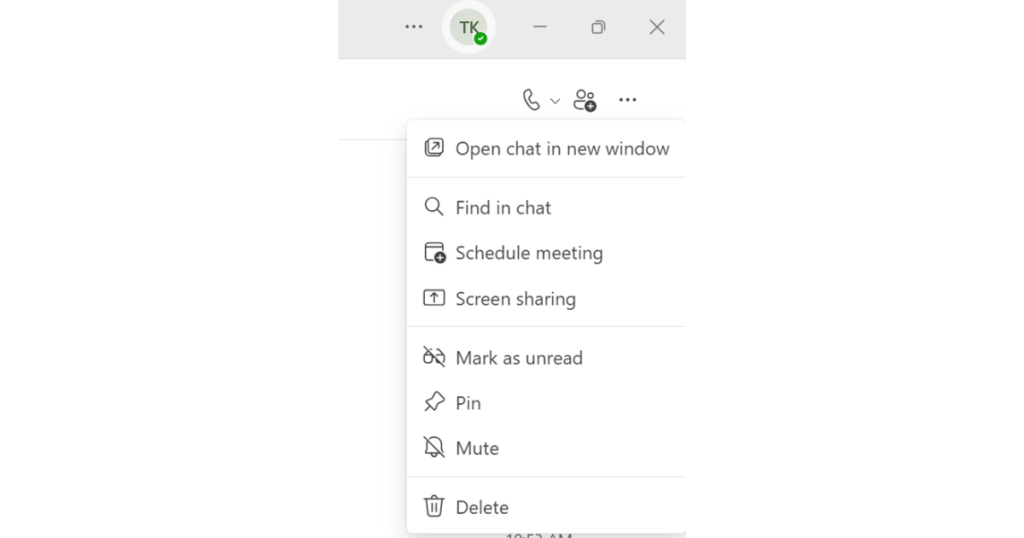
You can also initiate a voice or video call with a member through the chat option. Click on the ‘phone’ icon on the top right corner of the chat. 

You can explore more advanced options by clicking on the ‘three dots’ in the top right corner of the chat, in the same line as the phone icon. 

MS Teams chat options

From here you can share your screen OR schedule a meeting for later. 

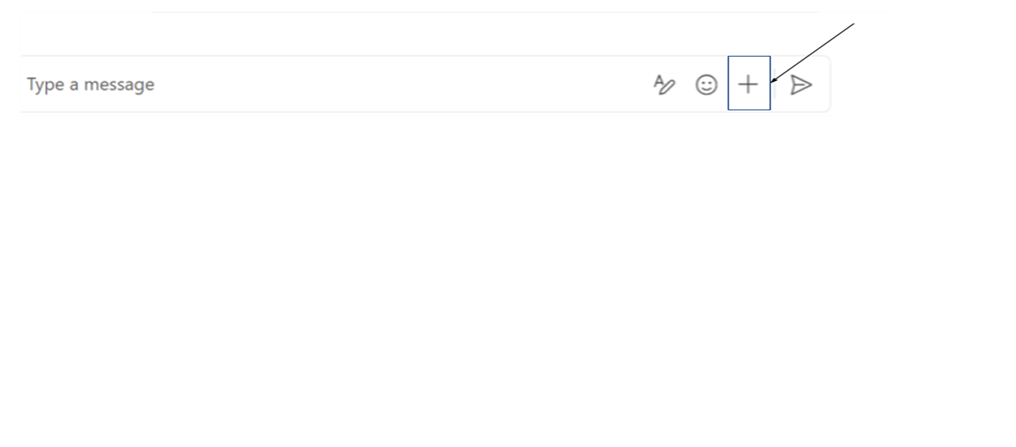
This how chat box will look like :

Teams chat option icon

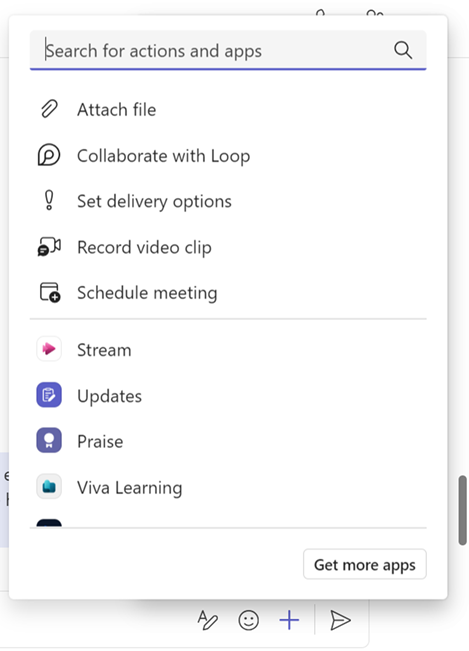
Below options will pop up when you click on the ‘ + ‘ icon :

Teams chat options

Method 2: Sharing via Teams Channels

  1. Access the Target Team: Within the Teams application, navigate to the specific team containing the channel where you want to share the document.
  2. Open the Channel: Select the desired channel from the list displayed under the team name.
  3. Upload or Share Option: Click the “+” icon located next to the channel name and choose either “Upload file” to directly upload a document from your computer or “Browse in OneDrive” to access your OneDrive storage.
  4. Locate and Select File: If selecting “Browse in OneDrive,” navigate through your folders and choose the document you want to share.
  5. Sharing Options (Optional): Similar to the chat method, you can access sharing options by clicking the three dots “…” next to the file name. This allows you to define access permissions for the document within the channel.
  6. Add a Description (Optional): Optionally, you can add a brief description about the document within the channel message for better context.
  7. Post to Channel: Click the “Post” button to share the document within the selected Teams channel.

How to add a member that’s not a part of your organization:

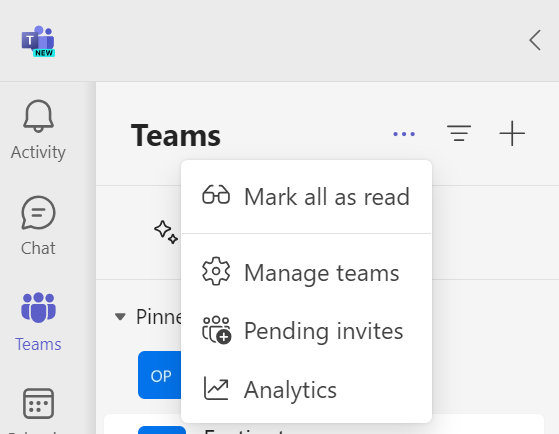
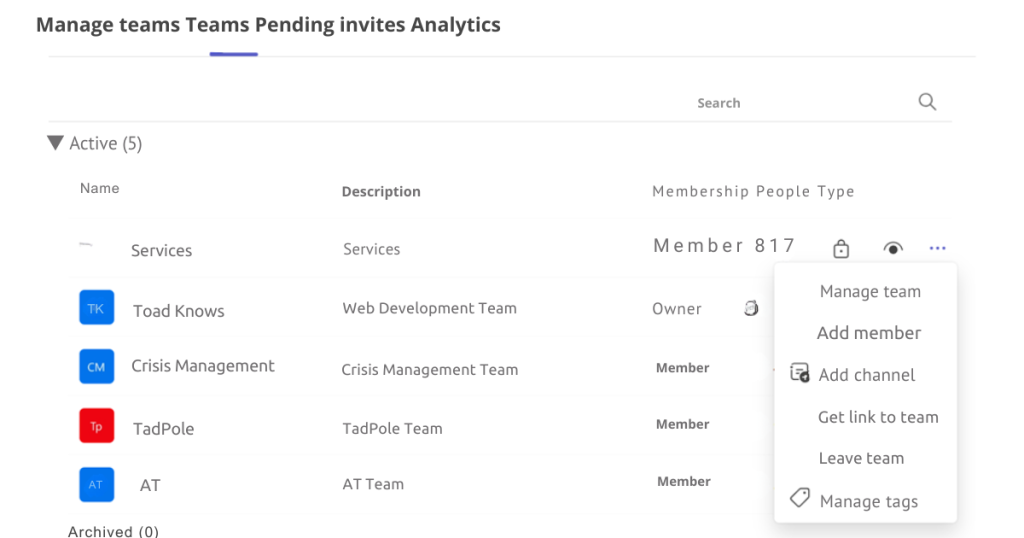
Click on the Teams icon to open the sidebar. 

Adding a team member that's not part of the organization

From there, click on manage teams. You will now come across the following pop up: 

Managing Teams pending invites

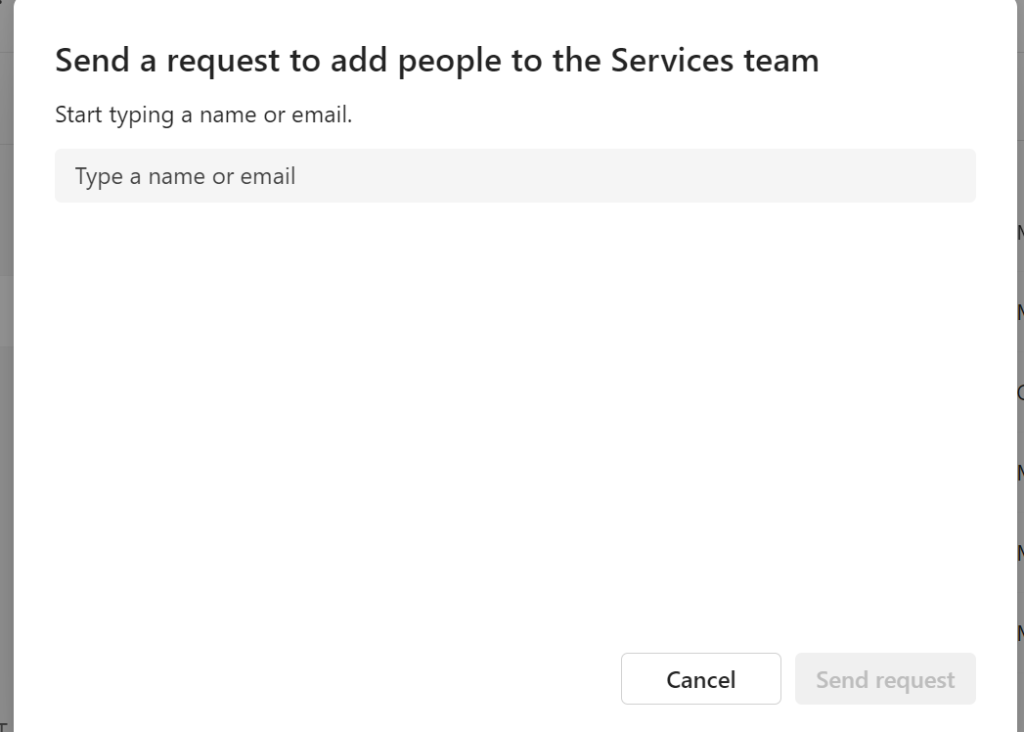
Click on 3 dots and select add member by entering the email address of the guest. 

Request to add new team member in MS Teams

By understanding how to create teams, channels, and leverage apps, you can effectively utilize Microsoft Teams to streamline communication, collaboration, and process automation within your organization.

You may also be interested to read : Microsoft Teams App – Cloud-Based Communication Platform 

FAQs

Can I download Microsoft Teams for free?

Yes, you can download Microsoft Teams for free. There’s a free version available for personal use called “Microsoft Teams (free)”. It offers features like unlimited chat, file sharing, video calls for up to 60 minutes with up to 100 participants, and 5GB of cloud storage.

To download it, you can visit the official Microsoft Teams download page [Microsoft Teams download]. You’ll need a Microsoft account to sign up for the free version

Do I need to install Teams to join a meeting?

No, you don’t necessarily need to install Teams to join a meeting. There are two ways to join a Teams meeting:

  • Join on the web: If you click on a Teams meeting link, you’ll usually be given the option to “Join on the web” instead of downloading the app. This will launch a web version of Teams in your browser (Microsoft Edge or Google Chrome are currently supported). You may be prompted to allow Teams to use your microphone and camera.
  • Join with the app: If you already have Teams installed, you can also click the link and it will automatically open the meeting in the app. This can offer a more feature-rich experience than the web version.

Microsoft Teams User Guide: Learn All About Microsoft Teams Download, Usage, & Benefits Read More »

SharePoint VS OneDrive

SharePoint vs OneDrive – Choosing The Right Tool

Cloud storage is a model of data storage where digital information is stored on remote servers managed by a third-party provider. It has become crucial to study and understand subjects like SharePoint vs OneDrive because cloud storage has become a fundamental element of the modern digital workspace.

Users access their data through the internet or a dedicated network connection, eliminating the need for physical storage devices like hard drives or local servers. 

Part of Microsoft 365 subscription, SharePoint and OneDrive both utilise cloud storage for data persistence, yet they serve distinct purposes and offer unique functionalities.

SharePoint vs OneDrive: Understanding SharePoint 

SharePoint is a web-based platform within the Microsoft 365 suite designed for collaborative content management and document sharing. 

It serves as a central repository for storing, organising, and managing various digital assets, facilitating seamless collaboration and information sharing within teams or organisations.

SharePoint fosters collaborative work by allowing multiple users to edit and share documents concurrently. 

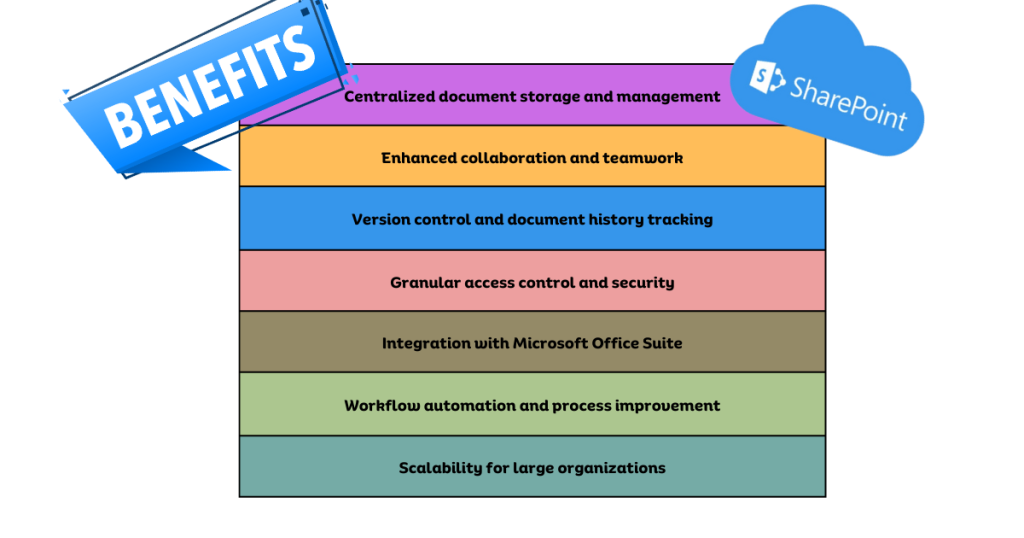
Furthermore, SharePoint offers advanced features like workflow automation, version control, and metadata management, catering to complex information management scenarios.

Key features of SharePoint

FeatureDescription 
Document LibrariesSharePoint allows creating and managing structured document libraries to organise and store different file types. Users can upload, edit, and share documents within the library, ensuring version control and facilitating collaborative editing.
ListsSharePoint offers customizable lists to manage various types of data, such as tasks, contacts, events, and surveys. These lists provide structured views and functionalities specific to the data type, enhancing information organisation and access.
Version ControlIt automatically tracks document versions, allowing users to revert to previous versions if necessary. This ensures data integrity and facilitates collaboration by enabling teams to track changes and maintain historical records.
Co-authoringMultiple users can edit documents simultaneously within SharePoint, eliminating the need for manual merging and version conflicts. This feature streamlines collaboration and improves team productivity.
User PermissionsGranular access control mechanisms allow administrators to define specific permissions for individual users or groups, ensuring data security and compliance with organisational policies.
WorkflowsSharePoint enables the creation of automated workflows to streamline repetitive tasks and processes. These workflows can be triggered by specific events, such as document creation or approval, and automate various actions, such as sending notifications or assigning tasks.
Powerful SearchSharePoint offers robust search capabilities, allowing users to quickly find information across the entire platform. 
Microsoft 365 IntegrationIt seamlessly integrates with other Microsoft 365 applications, such as Teams, OneDrive, and Power BI. This integration enables users to leverage functionalities from these applications within SharePoint, fostering a cohesive user experience and enhanced productivity.
Third-Party IntegrationsSharePoint supports integration with various third-party services and applications, expanding its functionalities and catering to specific business needs.

By understanding these core functionalities and key features, organisations can leverage SharePoint to improve document management, foster collaboration, and streamline information sharing within their teams.

Benefits of SharePoint - Table

Potential drawbacks of SharePoint

While SharePoint offers a robust platform for collaborative content management, it’s important to acknowledge potential drawbacks that organisations should consider during implementation and utilisation. 

Complexity and Learning CurveSharePoint can be a complex platform to set up and manage, particularly for organizations with limited experience or technical expertise. 
Customization CostsExtensive customization options exist within SharePoint to tailor the platform to specific organisational needs. However, these customizations can be resource-intensive and require specialised skills, potentially leading to significant development and maintenance costs.
Security ConcernsAs with any cloud-based platform, security considerations are paramount. While Microsoft implements robust security measures, organisations must adopt appropriate access control policies and user training to mitigate potential security risks associated with data sharing and collaboration.
Limited Offline FunctionalityWhile some functionalities exist for offline access, SharePoint primarily operates online.
Integration ChallengesDespite offering integration capabilities, integrating SharePoint with various third-party applications and services can be complex, requiring technical expertise and potentially incurring additional development costs.
Vendor Lock-inMigrating data and functionalities away from SharePoint to another platform can be challenging due to its inherent reliance on Microsoft 365 services.
Licensing CostsDepending on the chosen plan and features utilised, SharePoint licensing costs can accumulate, particularly for larger organisations with many users.
Search ComplexitiesWhile offering powerful search capabilities, effectively utilising SharePoint’s search functionality can require advanced configuration and understanding of search indexing and metadata management. 

SharePoint vs OneDrive: Understanding OneDrive

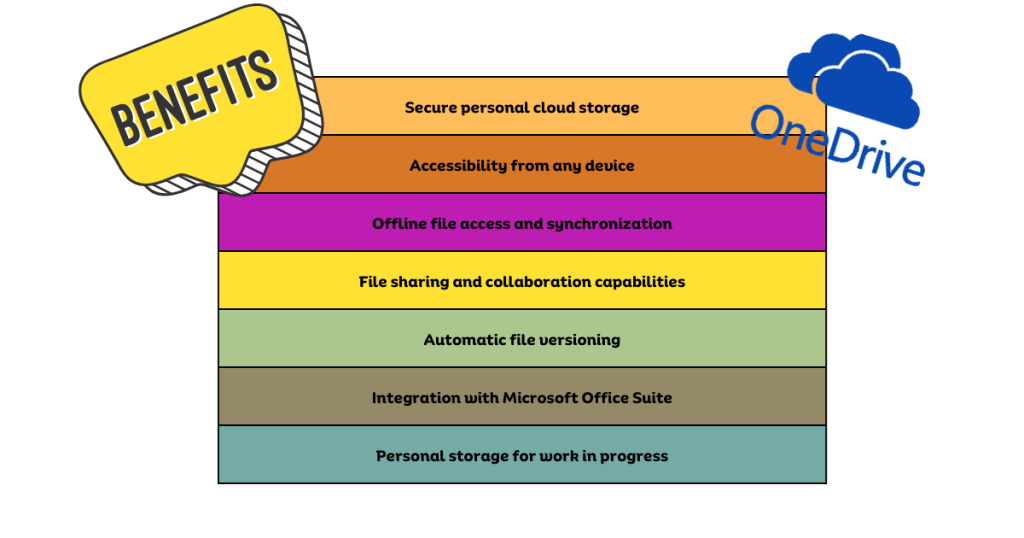
OneDrive is a cloud storage service offered within the Microsoft 365 suite. It provides individual users with a dedicated online storage space accessible from various devices, including desktops, laptops, and mobile phones. 

It serves as a personal repository for storing, managing, and sharing various digital assets, facilitating individual file backup, organisation, and collaboration.

Additionally, it allows selective sharing of files and folders with specific users or groups, enabling controlled collaboration.

OneDrive is the tool of choice for people looking for individual file storage and basic sharing. 

Key features of OneDrive

Feature Description
Cloud StorageOneDrive offers a designated storage quota for each user within the cloud, eliminating the need for local storage limitations on individual devices.
File Uploads and DownloadsUsers can upload various file types to OneDrive and download them for offline access on their devices.
File OrganizationOneDrive allows creating folders and subfolders to organise stored files and maintain a structured hierarchy.
File SyncOneDrive integrates with desktop and mobile applications, enabling seamless synchronisation of files between the cloud storage and local devices. Users can choose to keep local copies of files for offline access and have changes automatically reflected in the cloud upon reconnection.
Shared FoldersIt facilitates collaboration by allowing users to share folders with others, granting them editing or viewing permissions. This enables multiple users to work on the same files simultaneously, fostering teamwork and efficient content creation.
Real-time Co-authoringCertain file types, such as Word documents and Excel spreadsheets, support real-time co-authoring within the web application. 
EncryptionOneDrive encrypts data at rest and in transit, ensuring the security of stored information.
Mobile App OneDrive offers dedicated mobile applications for Android and iOS devices. These apps allow users to access their cloud storage, view and manage files, and share content directly from their mobile devices.
Seamless IntegrationIt integrates seamlessly with other Microsoft 365 applications, such as Word, Excel, PowerPoint, and OneNote. This allows users to directly save and access documents from within these applications, enhancing workflow efficiency.

OneDrive serves as a valuable tool for individual users seeking a secure and accessible platform for storing, managing, and sharing their digital assets. 

Benefits of OneDrive - Table

Potential drawbacks of OneDrive

While OneDrive offers a convenient and user-friendly solution for personal cloud storage, it’s important to acknowledge potential drawbacks that users should consider before solely relying on this service.

1. Limited storage capacity: The free storage tier offered by OneDrive is relatively limited compared to other cloud storage providers. This can pose a challenge for users who require significant storage space for their data, potentially leading to the need for paid subscription plans.

2. Reliance on internet connectivity: Uploading, downloading, and accessing files stored in OneDrive requires a stable internet connection. This can be problematic for users with limited or unreliable internet access, hindering their ability to utilise the service effectively.

3. Security concerns: While OneDrive implements security measures like encryption, the inherent nature of cloud storage introduces inherent security risks. Users must be vigilant about password security, access control settings, and potential phishing scams to mitigate these risks.

4. Limited offline functionality: While OneDrive offers offline access options for certain files, full functionality and feature availability are often limited compared to the online experience. This can be inconvenient for users who require consistent access to their files in scenarios with limited or no internet connectivity.

5. Version control limitations: Although OneDrive maintains version history for files, its version control capabilities are less comprehensive compared to dedicated document management systems. This might be insufficient for users requiring advanced version control functionalities, such as detailed change tracking or branching capabilities.

6. Vendor lock-in: Migrating data away from OneDrive to another cloud storage service can be complex, especially if users have heavily utilised its integration with other Microsoft 365 applications. This can create a degree of vendor lock-in, potentially hindering future flexibility in choosing alternative cloud storage solutions.

7. File size limitations: OneDrive imposes limitations on the size of individual files that can be uploaded. This can be restrictive for users who need to store large files, such as high-resolution images or video recordings, potentially requiring them to utilise alternative storage solutions.

8. Sharing permissions management: While OneDrive allows sharing files and folders, managing granular access permissions for large numbers of users or complex sharing scenarios can become cumbersome, potentially leading to security risks or unintended access to sensitive information.

SharePoint vs OneDrive: Choosing the right tool

FeatureOneDriveSharePoint
Primary PurposePersonal cloud storage and file managementCollaborative content management and document sharing
Target UsersIndividual usersTeams, departments, and organisations
Storage CapacityLimited free tier, paid plans for additional spaceVaries depending on the chosen plan
File Types SupportedVarious file typesVarious file types
File OrganizationFolders and subfoldersDocument libraries, lists, and folders
Collaboration FeaturesShared folders, limited real-time co-authoringShared libraries, co-authoring, granular access control
SynchronisationSeamless synchronisation with local devicesOptional synchronisation for specific libraries
Mobile AccessDedicated mobile appMobile app with limited functionality compared to web interface
Version ControlBasic version historyComprehensive version history and audit trails
SecurityEncryption at rest and in transitEncryption at rest and in transit, additional security features like user permissions and compliance controls
IntegrationIntegrates with other Microsoft 365 applicationsIntegrates with other Microsoft 365 applications and various third-party services
CostFree tier with limited storage, paid plans for additional spacePaid subscription plans required
ComplexityUser-friendly interfaceMore complex setup and management, requires training for administrators and users

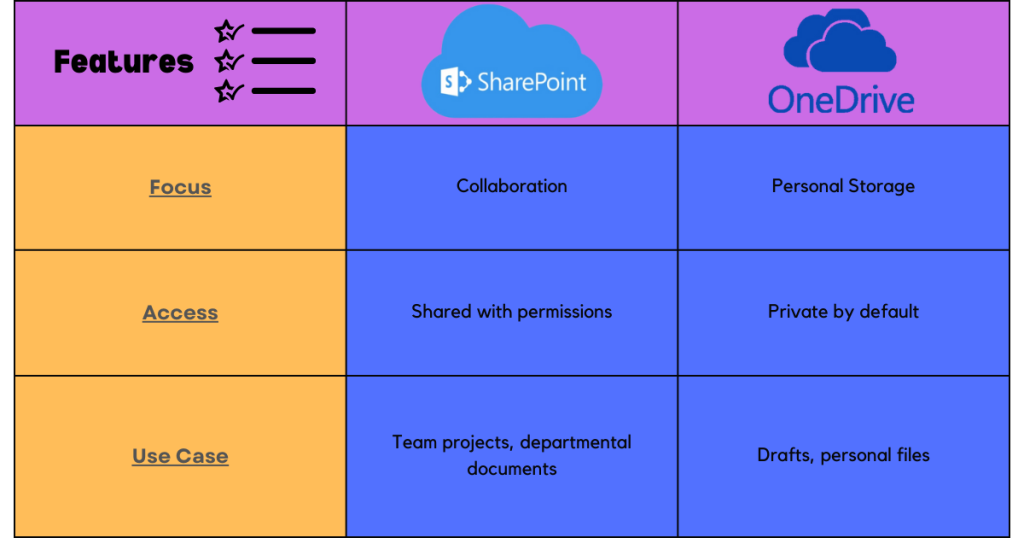
The choice between OneDrive and SharePoint depends on the specific needs and requirements of the users or organisation. Generally, OneDrive is the tool of choice for individual use and SharePoint is the perfect choice for organisations/businesses

Feature Comparison of SharePoint and OneDrive

Though OneDrive and SharePoint dominate the market of cloud storage, there are other applications that also serve the same purpose. 

  1. Dropbox: Dropbox is a popular cloud storage service offering individual users and teams a platform to store, share, and collaborate on files. It is more commonly used for individual file sharing and provides a user-friendly and accessible cloud storage solution.
  1. Google Drive: Google Drive is a cloud storage service offered as part of the Google Workspace suite. It allows users to store, access, and share various file types, from documents and pictures to videos and software. Google Drive integrates seamlessly with other Google services like Gmail, Docs, Sheets, and Slides, fostering a cohesive and efficient work environment. Unlike Dropbox, it is more commonly used for collaborative document editing. 

Neither OneDrive nor SharePoint is capable of becoming the leading cloud storage solution for all. This is because choosing the right solution is dependent on an individual’s needs, preferences, and targeted use. 

FAQs

Should I use SharePoint or OneDrive?

Both OneDrive and SharePoint offer optimal cloud storage solutions, but the best choice depends on your specific needs. If you’re unsure which option is right for you, consider your collaboration requirements, the complexity you’re comfortable with, and your budget.

Is Microsoft OneDrive the same as Microsoft Office?

No, Microsoft OneDrive and Microsoft Office are not the same. They are distinct products offered by Microsoft, although they both integrate and interact with each other within the Microsoft 365 ecosystem. 

Is SharePoint more secure than Google Drive?

Both SharePoint and Google Drive offer robust security measures to protect user data, making it difficult to definitively say one is objectively “more secure” than the other. Each platform has its own strengths and weaknesses to consider.

SharePoint vs OneDrive – Choosing The Right Tool Read More »
Microsoft Teams App – Cloud-Based Communication Platform 

Microsoft Teams app is a cloud-based collaboration platform designed for real-time communication and information sharing within organizations. 

It functions as a central hub, offering a comprehensive suite of features to enhance teamwork and streamline workflows. 

The Teams app helps you in unlocking the full potential of your meetings by making them more interactive, engaging, and productive. 

Last but not least, Microsoft Teams helps in real-time problem solving by bringing content and data from apps into meetings, collecting feedback, and accelerating decision-making.

Key features of Microsoft Teams App

Communication and CollaborationTeams facilitates communication through persistent chat channels, enabling threaded conversations and information exchange among team members. It also supports direct messaging for private communication. Moreover, it helps in maintaining post-meeting engagement by circulating notes and results captured by the apps.
Organization and Task ManagementIntegration with task management tools like Planner and To Do allows teams to create, assign, and track tasks directly within Teams. This fosters accountability and ensures everyone is aligned on project goals and individual contributions.
Video Conferencing and MeetingsThe platform allows users to conduct online meetings with video conferencing capabilities. Features include screen sharing, file sharing, and real-time collaboration tools like Microsoft Whiteboard.
Security and AccessibilityModern Authentication protocols and multi-factor authentication (MFA) ensure only authorized users can access Teams and organizational data. Additionally, Teams meetings are protected with features like lobby bypass restrictions and attendee controls.
File Sharing and Co-authoringTeams integrates with cloud storage services like OneDrive and SharePoint, enabling seamless file sharing and co-authoring of documents. Team members can access, edit, and share files within the platform itself.

Overall, Microsoft Teams provides a unified platform for communication, collaboration, and information sharing, promoting efficient teamwork within organisations.

Benefits of Microsoft Teams App

Microsoft Teams offers a comprehensive suite of features that enhance communication, collaboration, and task management within organizations.

  1. Unified Communication and Collaboration Hub:
Centralized Platform Teams consolidates communication channels (chat, meetings, calling), file storage (OneDrive, SharePoint), task management tools (Planner, To Do), and project discussions into a single platform. This reduces context switching and improves team focus.
Enhanced Visibility & CommunicationReal-time messaging, video conferencing, and persistent chat channels enable open communication and information sharing. Team members gain improved visibility into project progress, deadlines, and task assignments.

  1. Streamlined Task and Project Management: 
Integrated Task Management Integration with tools like Planner and To Do allows for creation, assignment, and tracking of tasks directly within Teams. This fosters accountability, aligns team members with project goals, and simplifies task management workflows.
Improved Project Oversight Dedicated channels for projects centralize project discussions, files, and tasks. This provides stakeholders with a clear view of progress, milestones, and decision-making processes.
Real-time Document CollaborationMicrosoft Office 365 integration allows for real-time co-authoring of documents within Teams. This eliminates version control issues, streamlines editing processes, and ensures everyone works on the latest version.

  1. Increased Efficiency & Productivity:
Reduced Email Clutter Centralized communication and collaboration tools minimize reliance on email, reducing clutter and improving workflow efficiency.
Streamlined Workflows Teams automates repetitive tasks and simplifies information access, leading to increased productivity for individual team members and entire organizations.
Enhanced Remote Team Management Video conferencing, file sharing, and real-time messaging enable effective communication and collaboration for geographically dispersed teams.

  1. Security and Accessibility:
Robust Data Security Data encryption (in transit and at rest), user authentication/authorization (MFA, RBAC), and Data Loss Prevention (DLP) safeguard sensitive information and ensure compliance with security regulations.
Secure Meetings Secure meeting features like lobby bypass restrictions and attendee controls prevent unauthorized access and protect confidential discussions.
Centralized Security Management The Microsoft 365 Security Center provides administrators with security posture overviews, threat detection, and reporting tools for proactive risk management.
Comprehensive Accessibility FeaturesScreen reader support, keyboard shortcuts, live captions/transcripts, high contrast mode, color themes, magnifier, and support for live captions/sign language interpretation ensure an inclusive environment for users with diverse needs.

In conclusion, the Microsoft Teams application offers a multitude of benefits for organizations. 

It fosters a secure, efficient, and collaborative work environment through its unified communication platform, streamlined task management functionalities, and commitment to robust security and accessibility features.

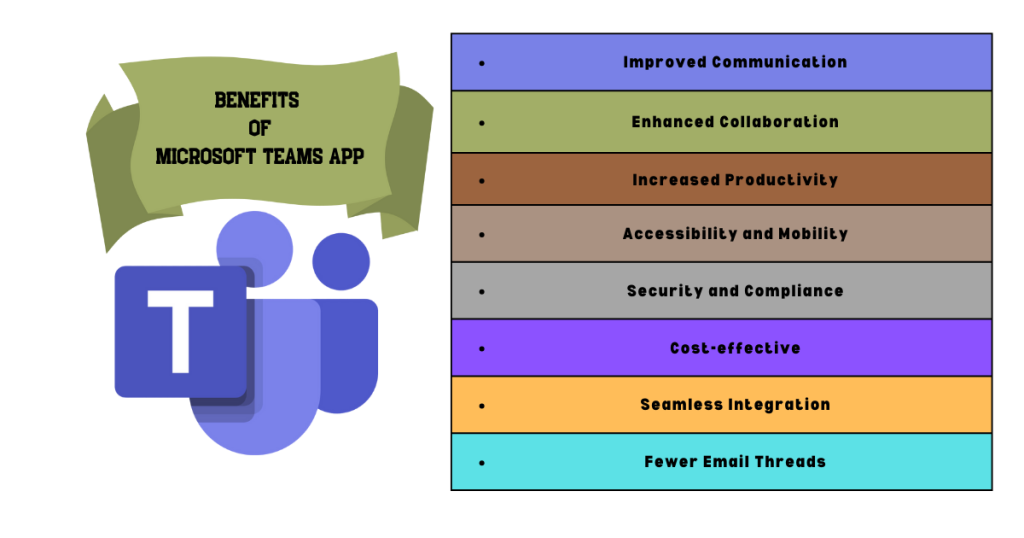
Benefits of Microsoft Teams App

How to get started with Microsoft Teams App

Getting started with the Microsoft Teams app is divided into multiple steps which are as follows:

Prerequisites:

  • An active Microsoft 365 subscription that includes Teams functionality.
  • An internet connection.
  • A compatible device (computer, smartphone, tablet).

Step #1: Application Installation 

  • Desktop users should locate the Microsoft Teams application within their organization’s software distribution platform (e.g., Microsoft Endpoint Manager/M365 Portal).
  • Mobile users should access their device’s application store (e.g., Apple App Store, Google Play Store) and then search for “Microsoft Teams.”
  • Initiate the installation process according to your desktop/device’s requirement.  

Step #2: Initial Login 

  • Launch the Microsoft Teams application.
  • Enter your organizational Microsoft 365 username and password.
  • If prompted, complete any required multi-factor authentication (MFA) steps.

Step #3: Team Discovery and Joining 

Teams can be categorized into two main types:

  • Public Teams: Discoverable by all users within an organization. You can join these teams directly through the Teams application search function.
  • Private Teams: Require an invitation from a team owner or member. You will receive a notification within Teams when an invitation is available.

Step #4: Exploring the Teams Interface 

  • Teams: Lists all the teams you are a member of.
  • Chats: Provides access to direct and group messaging functionality.
  • Calendar: Enables scheduling and management of meetings and events.
  • Calls: Facilitates voice and video calling functionalities.
  • Files: Offers access to cloud-stored files and collaboration tools.
  • Apps: Provides integration with various third-party applications and Microsoft services.

Step #5: Customizing Settings 

  • Access the Settings menu within Teams to personalize your user experience.
  • You can customize notification preferences, accessibility settings, and keyboard shortcuts.

Step #6: Creating a Team

  1. Launch the Microsoft Teams application.
  2. In the left navigation pane, locate and click the “Teams” icon.
  3. At the top of the “Teams” list, click the “Join or create a team” button.
  4. Select “Create team” from the displayed options.

Creating a Team from Scratch:

When you decide to create a Team from scratch, choose between:

  • Private: This creates a team where only specific members you invite can join.
  • Public: This creates a team discoverable by anyone in your organization, allowing them to request membership.
  1. Enter a Team name that clearly reflects the team’s purpose.
  2. (Optional) Add a Team description to provide additional context about the team’s function or goals.
  3. Click the “Create” button.

Adding Team Members:

  1. In the “Add members” section, start typing the names or email addresses of individuals you want to invite to the team.
  2. Select the appropriate users from the search results.
  3. You can choose their role within the team: Owner (full access and permissions) or Member (standard access).
  4. Click the “Close” button once you’ve added all desired members.

Note: Specific functionalities and configurations within the Teams application may vary depending on an organization’s Microsoft 365 subscription plan and administrator settings.

Microsoft Teams app is an all-in-one application that connects you with other people online. With the help of Microsoft Teams app, you can share content, meet, and chat with people from all around the world. 

Limitations of Microsoft Teams App

Microsoft Teams, while a powerful collaboration tool, does have some limitations to consider. Here’s a breakdown of some key areas to be aware of:

Limited CustomizationTeams offers a professional interface, but customization options are limited. Branding elements specific to your organization might be difficult to integrate.
Integration ChallengesWhile Teams integrates well with Microsoft products, incorporating external applications can be complex. This may disrupt workflows if your organisation relies on various non-Microsoft tools.
Performance and Scalability ConcernsLarge teams with extensive data sharing may experience performance issues like slow loading times or lag.
Usability Learning CurveThe feature-rich interface can present a steeper learning curve for new users, potentially hindering initial adoption and user satisfaction.

FAQs

How can I use Microsoft Teams on my mobile?

Install the Microsoft Teams app on your mobile. Sign in by entering your organisational Microsoft 365 username and password. Now you’ll see a list of all the Teams you’re a member of. Tap on a team to access its channels, conversations, and files. .

How to install Microsoft Teams on Windows?

Installing Through Microsoft Teams Website

  1. Open a web browser.
  2. Navigate to the official Microsoft Teams download page: https://www.microsoft.com/en-us/microsoft-teams/download-app
  3. Click the “Download for desktop” button.
  4. On the next screen, choose the appropriate download option based on your needs:
    • “Download Teams”: This downloads the installer for users with a Microsoft 365 work or school account.
    • “Get the free app (for personal use)”: This downloads the free version of Teams suitable for personal use and collaboration.
  5. Click the downloaded file (typically named “Teams_windows_x64.exe”).
  6. Follow the on-screen instructions during the installation process. This might involve accepting licence agreements and choosing an installation location.
  7. Once the installation is complete, you can launch Microsoft Teams from your Start menu or desktop shortcut.
What is Microsoft Teams’ worst feature?

 Identifying the absolute “worst” feature of Microsoft Teams can be subjective, as different users prioritise different functionalities. What may be the worst feature for one user, may be the best feature for another. So to label one specific feature as the worst would not be fair or accurate. 

How to Use the Inspection App in Microsoft Teams?
  1. Launch the Microsoft Teams application.
  2. Navigate to the desired Team where the Inspection App is installed.
  3. Look for the “Inspection” tab within the Teams channel.

Performing Inspections:

  1. Click on the “Inspection” tab.
  2. You’ll likely see a list of pre-defined inspection forms or templates relevant to your team’s needs.
    • If your team uses custom forms, these will be displayed here.
  3. Select the appropriate inspection form you want to use.
  4. A preview of the inspection checklist will typically be displayed. This might include sections, questions, and answer options specific to the chosen form.
  5. Click on the “Begin Inspection” button to initiate the data collection process.
How do I join the Microsoft Teams meeting on a Mac?

There are two main ways to join a Microsoft Teams meeting on a Mac:

1. Joining from a Meeting Link:

This is the most common way to join a Teams meeting.

  • Locate the meeting invitation: You’ll likely receive an email or calendar invite containing a link to join the Teams meeting.
  • Click the “Join Microsoft Teams Meeting” link within the invitation.
  • Choose how you want to join: A pop-up window will appear with two options:
    • “Open Microsoft Teams”: This will attempt to launch the Microsoft Teams application on your Mac if it’s installed.
    • “Join on the web”: This will allow you to join the meeting directly in your web browser without needing the Teams app installed.

2. Joining Through the Teams App:

If you already have the Microsoft Teams application installed on your Mac, you can join a meeting directly through the app:

  • Launch the Microsoft Teams application.
  • Navigate to your calendar: In the left navigation pane, click on the “Calendar”icon.
  • Find the meeting: Locate the meeting you want to join in your calendar view.
  • Click the meeting: Click on the meeting to open its details.
  • Join the meeting: Click the “Join” button.

Microsoft Teams App – Cloud-Based Communication Platform  Read More »
Open Source Alternatives To Adobe Photoshop

Beyond Photoshop – Exploring Image Editing With Open Source Tools

It wouldn’t be wrong to say that Adobe Photoshop is the biggest name in the world of image editing. As of February 2024, in the graphic design software market, Photoshop has a market share of 42%. After the longest time of looking only up to Adobe for image editing, people are now embracing the power of Open Source image editing tools.

Photoshop’s extensive popularity could be attributed to its various features and tools for editing. Its capabilities extend beyond basic image editing to graphic design and digital art creation. 

Before we explore the details of these image editing tools, let’s take a brief look at open source software and its enormous benefits. 

The Benefits Of Open Source Software

An open source software is free to view, use, edit, modify, and share. Unlike proprietary software, the source code of open source is easily accessible by its users. 

Moreover, developers and programmers are legally allowed to modify the source code and then share it with whomever they want. 

Some major advantages of open source image editing are:

Cost-effectivenessThe biggest advantage is undoubtedly the free price tag. This makes these tools accessible to everyone, regardless of budget, democratizing image editing tools and fostering creativity.
CustomizationOpen-source nature allows for customization and plugin development by anyone. This provides a wider range of features and tools beyond the core offering, tailor-made to specific needs.
Transparency and SecurityOpen-source code allows for scrutiny and independent audits, potentially enhancing security and trust compared to closed-source programs.
Community SupportA large and active community provides extensive documentation, tutorials, and forums for support and learning, fostering collaboration and knowledge sharing.

The popularity of open source software is drastically increasing because of its cost-effectiveness, user-friendliness, freedom to edit and share its source code, and collaborative impact on the community. 

What is Open Source Alternative To Photoshop?

Until recently, Photoshop used to be an indispensable requisite for design work. However, the emergence of open source alternatives made people realize that the outcome of both free and expensive proprietary software tools like Adobe Photoshop is indistinguishable from each other. 

Open source photoshop is more of a concept than an application/tool. This concept entails using a tool that works with an open source software. 

But why are more and more people shifting towards open source photoshop and software? 

While Adobe Photoshop stands at the #1 spot in the world of professional image editing, its hefty price tag can be a barrier for entry, especially for casual users and hobbyists. This is where open-source photoshop like GIMP shines, offering a powerful and feature-rich alternative for free.

Open Source Photoshop Alternative – GIMP

Gimp Logo

GNU Image Manipulation Program aka GIMP is the most popular open source photoshop alternative to Adobe.

According to studies, its features are the closest to expensive proprietary software like Adobe and because it’s a cross-platform, it is supported and backed by a huge online community. 

GIMP is available for GNU/Linux, macOS, Windows, and other operating systems. 

The only difference that gives GIMP an edge over Adobe Photoshop is its availability at no cost at all. GIMP is a free photoshop alternative whose source code can be easily accessed, edited, and redistributed by its users. 

Furthermore, it is the perfect photo editing tool for casual users, small-scale photographers, graphic designers, and hobbyists because it offers a wide variety of photo editing features without charging a single penny. 

Apart from its built-in features, GIMP offers many customization options and 3rd party plugins that will take your productivity up a notch. 

GIMP provides extensibility and flexibility through integration with many other programming languages such as Scheme, Python, and Perl. This makes this open source photoshop alternative a highly customizable program. 

Although GIMP has many advantages that have undoubtedly made it public’s most favorite open source photo editing software, there are some potential drawbacks that need to be addressed before GIMP can completely take over Adobe Photoshop. 

Potential drawbacks of GIMP

  • Unlike Adobe, GIMP has a steeper learning curve. Beginners and casual users can find it difficult to use due to its extensive toolset. 
  • In comparison to GIMP, Photoshop generally offers faster performance and hardware acceleration, especially for complex tasks.
  • Lastly, Adobe Photoshop offers a wider range of built-in features and specific tools that are not available with GIMP. 

Now let’s explore the advantages and drawbacks of other open source photoshop alternatives. 

Open Source Photoshop Alternative – Krita 

Krita Logo

Krita is another open source photo editing tool that doesn’t come with a hefty price tag. It is the ideal tool for painters and animators because it has one of the best (if not the best) brush emulators. 

It boasts a vast library of free brushes and the ability to create custom brushes, offering great flexibility and artistic expression.

While not dedicated animation software, Krita offers surprisingly robust animation tools, making it a viable option for simple 2D animations.

Vector tools and layer capabilities allow for editing without permanently altering your artwork, giving you room for experimentation.

Lastly, Krita works seamlessly across Windows, macOS, and Linux, offering compatibility regardless of your operating system.

Despite all that Krita has to offer, it still hasn’t been able to come close to the popularity of Adobe Photoshop because of some major potential pitfalls. 

Potential drawbacks of Krita

                  Drawback                  Description
Limited Photo EditingWhile good for basic editing, Krita lacks the depth and features of dedicated photo editing software like Photoshop.
Steeper Learning CurveCompared to simpler programs, Krita’s extensive features make it less user-friendly.
Less Established ResourcesKrita has a smaller user base compared to commercial software, resulting in fewer tutorials and learning materials.
Text Tool LimitationsThe text tool is basic and lacks the advanced features found in dedicated design software.
Limited Plugin SupportCompared to commercial software, Krita has fewer third-party plugins available.

Open Source Photoshop Alternative – Photopea

Photopea Logo

Photopea offers a cloud-based image editing platform capable of advanced photo manipulation functionalities, similar to Adobe Photoshop

This web-based application eliminates the need for software installation, allowing users to access its comprehensive editing suite directly through their web browsers.

The most distinguishing feature of this photo editing tool is that it does not require you to download it and can be used on any computer, phone, or tablet with an active internet connection.

Another major advantage of Photopea is its compatibility with JPG, PNG, and PSD (used by Photoshop).

Potential drawbacks of Photopea

Some significant disadvantages of Photopea are:

  • Needs internet: You can’t use it offline without internet access.
  • Might be slower: Not as fast as some downloaded programs, especially on slower internet connections.
  • Learning curve: Has lots of tools, so it might take some time to learn everything.
  • Ads: Has some ads on the screen which can cause a lot of distraction.

Open Source Photoshop Alternative – Darktable

Darktable Logo

For photographers seeking control and flexibility without hefty price tags, Darktable shines bright as a free and open-source alternative to commercial software. 

Some key features of Darktable are:

FeatureDescription
Non-destructive editingEdits are stored as instructions, leaving your original files untouched. Experiment freely without fear!
RAW image processingExtract the best from your RAW files with extensive color correction, noise reduction, sharpening, and lens correction tools.
Modular workflowA vast library of modules caters to diverse needs, from basic exposure adjustments to advanced local tone control and creative filters.
Powerful toolsDodge and burn, perspective correction, focus stacking, and HDR merging are just a few of the advanced options at your disposal.

Open Source Image Editing – Choosing the right tool

When selecting an image editing tool, it’s crucial to consider your needs, skill level, and budget. Here are key factors to ponder:

Your Editing Needs:

  • Basic edits: Cropping, resizing, brightness/contrast adjustments.
  • Advanced edits: Layer manipulation, masking, retouching, special effects.
  • Specific tasks: Graphic design, web development, animation.
  • Target audience: Professional photographers, casual users, social media content creators.

Skill Level:

  • Beginner: User-friendly interface, intuitive tools, tutorials, and resources.
  • Intermediate: Balance of ease and advanced features, learning curve acceptable.
  • Advanced: Powerful functionality, customization options, complex workflows.

Budget:

  • Free software: Open-source tools, limited features or learning curve.
  • Paid software: Subscription or one-time purchase, broader feature set, support.

Other Considerations:

  • Operating system compatibility (Windows, Mac, Linux).
  • Performance and hardware requirements.
  • Community and support availability.
  • Plugin ecosystem and integration with other tools.

Adobe Photoshop vs Open Source Editors:

Here’s a simplified comparison of key features:

FeatureAdobe PhotoshopGIMPKritaPaint.NET
PriceSubscription or PurchaseFreeFreeFree
Skill LevelAll Levels (Pro-Leaning)Intermediate/AdvancedIntermediate/AdvancedBeginner/Intermediate
Learning CurveHighHighMedium/HighLow to Medium
FeaturesExtensive – All Editing TypesExtensive – Mainly PhotoSpecialized Art ToolsBasic Photo Editing
Community & SupportLarge & ActiveLarge & ActiveActiveSmaller Community
Plugins & ExtensionsVast EcosystemGrowing EcosystemLimitedSome
CustomizationHighHighMediumLow
PerformanceHighModerate-HighModerate-HighModerate
PlatformsWindows & MacWindows, Mac, LinuxWindows & LinuxWindows Only

Why choose Open Source Image Editing Tools As An Alternate to Photoshop?

Choosing open-source software for image editing comes with various advantages. 

Open-source tools like GIMP, Krita, and Paint.NET are completely free to use and distribute, saving you the cost of expensive subscriptions or software purchases.

Many open-source editors offer robust features comparable to paid software, capable of basic and advanced edits, layer manipulation, filters, and plugins.

Moreover, with access to the source code (in some cases), advanced users can modify and personalize the software to fit their specific needs.

Choosing the best image editing tool depends highly on your needs, preferences, skill level, and profession. 

Ultimately, the best way to decide is to try out various options and see which one resonates with your needs and preferences.

Beyond Photoshop – Exploring Image Editing With Open Source Tools Read More »

Linux Mint

Linux Mint: User-friendly Open Source Operating System

Linux Mint is a free and open-source operating system (OS) designed for personal computers and laptops. It is based on the Ubuntu Linux distribution and is known for its user-friendly interface and extensive software availability.

This operating system provides a classic desktop experience with its out-of-the-box multimedia support, custom tools, and built-in applications. 

In recent times, Linux Mint has emerged as a viable alternative to Windows and macOS due to its beginner and user-friendly nature. 

Moreover, the desktop environment provided by Mint is quite familiar to Windows and macOS which makes transitioning from these operating systems easier and quicker. 

Who should use Linux Mint?

This open source operating system’s ease of use, extensive custom tools, and community-centric approach is suitable for beginners, professionals, as well as organizations. 

Linux Mint’s open source code and specific tools allow its users to customize it according to their needs and preferences. 

No hefty price tag ensures easy access for all whether you are a casual user, a hobbyist, or a professional developer. 

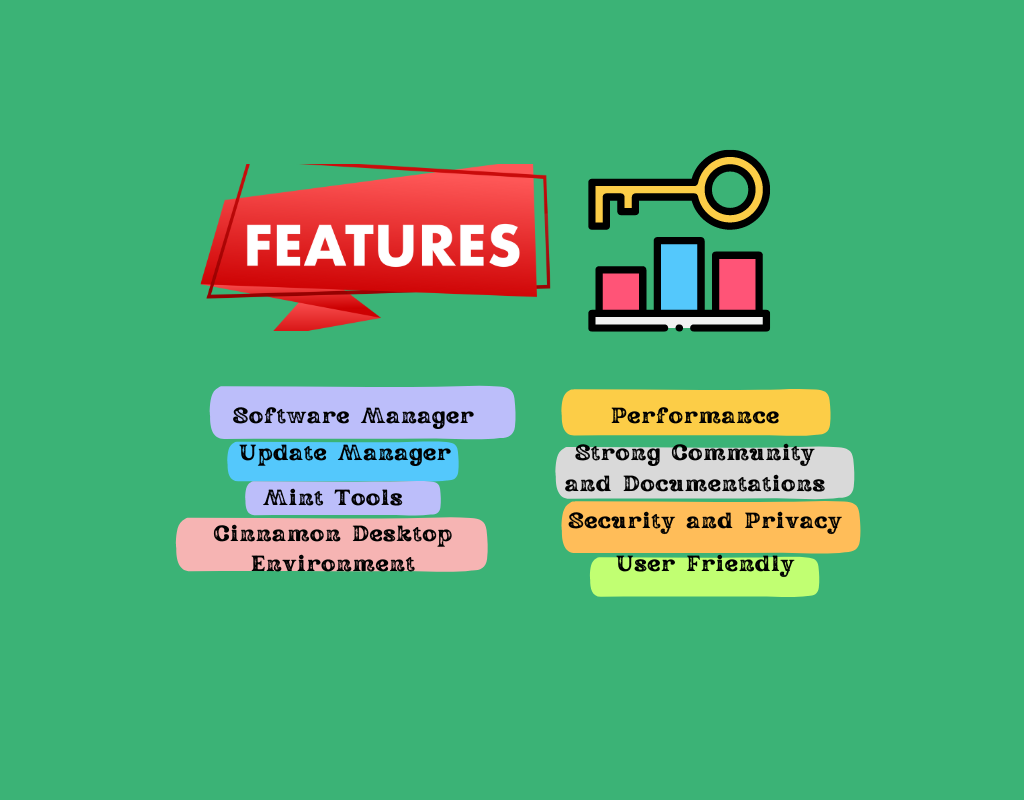
Benefits of Linux Mint

FeatureDescription
User-Friendly InterfaceLinux Mint prioritizes ease of use, providing a familiar desktop environment similar to Windows and macOS.
Pre-installed ApplicationsThis Linux distribution comes with a comprehensive suite of applications for everyday tasks, including web browsing, office productivity, multimedia playback, and image editing. 
Software AvailabilityLinux Mint leverages the vast software repositories of Ubuntu.
Open-Source SoftwareAs an open-source project, Linux Mint benefits from the contributions of a global developer community. 
Strong CommunityLinux Mint boasts a large and active user community that provides valuable resources. 

Key features of Linux Mint

CharacteristicOutcome
Ease of UseLinux Mint is renowned for its user-friendly interface, making it an approachable choice for users transitioning from other operating systems like Windows or macOS.
Customization AbilityLinux Mint empowers users with extensive customization capabilities. The system allows users to personalize their desktop environment to their preferences through themes, icons, and layout adjustments. 
Stability & Security Linux Mint prioritizes stability and reliability, making it a robust choice for everyday use. This is achieved through its foundation on the well-established Ubuntu and Debian Linux distributions, which are known for their stability and long-term support. 
Community Centric Mint’s vibrant community provides valuable resources and support to users, including online forums, comprehensive documentation, and troubleshooting assistance. Users can leverage these resources to seek help, share experiences, and contribute to the overall development of the Linux Mint ecosystem.
Out of the box OSLinux Mint works without the need of configuration or installation of extra applications. 
Compatible with Windows Linux Mint can be downloaded on a PC that already has Windows. A menu will ask you which one to use when you start the computer.
Key features of Linux Mint OS

Multiple editions of Linux Mint

Linux Mint has three different editions, each featuring a different desktop environment. 

CinnamonThe most modern, creative, and completely-featured desktop.
MATEMore traditional and quicker desktop.
XfceThe most lightweight desktop. 

Cinnamon Edition of Linux Mint

The Cinnamon edition is the most popular and the star version of Linux Mint. This edition is specifically designed for Linux Mint and is known for its intuitiveness and efficiency. 

Technical Specifications of the Latest Version (as of February 28, 2024):

  • Cinnamon Version: 5.8 (as included in Linux Mint 21.3 “Virginia”)
  • Based on: GNOME 3.38
  • Features:
    • Enhanced window management features
    • Improved applets and extensions functionality
    • Refined visual elements

Characteristic features of Cinnamon Edition

Modern InterfaceCinnamon offers a visually appealing and user-friendly desktop environment, similar to traditional desktop layouts from Windows and macOS. 
Customization OptionsCinnamon empowers users with extensive customization capabilities. Users can personalize their desktops through themes, applets, and extensions
EfficiencyCinnamon prioritizes efficiency, boasting a lightweight design and resource-conscious architecture. This translates to smooth operation even on systems with moderate hardware specifications.
Integration with Linux MintCinnamon is perfectly tailored to integrate seamlessly with the underlying Linux Mint framework. This integration ensures optimal system performance and an effective user experience.

The Cinnamon edition of Linux Mint delivers a user-friendly, customizable, and efficient desktop experience, making it a popular choice for individuals and organisations seeking a versatile and visually appealing operating system.

MATE edition of Linux Mint

The MATE edition of Linux Mint stands as a distinct variation designed for efficiency and stability. It utilizes the MATE desktop environment, a continuation of the GNOME 2 codebase, known for its lightweight design and mature codebase.

Technical Specifications of the Latest Version (as of February 28, 2024):

  • MATE Version: 1.28 (as included in Linux Mint 21.3 “Virginia”)
  • Based on: GTK+ 3
  • Features:
    • Improved performance and stability
    • Enhanced support for HiDPI displays
    • Additional customization options

The MATE desktop environment prioritizes a minimal resource footprint, making it suitable for older or less powerful hardware. This translates to smooth operation and efficient use of system resources.

Moreover, benefiting from a mature codebase and extensive testing, the MATE desktop environment prioritizes stability and reliability. This offers users a dependable platform for everyday tasks and professional applications.

The MATE desktop environment’s interface is similar to that of traditional Windows and macOS. This similarity offers an intuitive experience for users accustomed to those systems.

Like the Cinnamon edition, MATE also offers a reasonable degree of customization. With the help of applets, themes, and panel adjustments, users can modify the environment according to their preference. 

The MATE edition of Linux Mint caters to users seeking a stable, efficient, and familiar desktop experience. Its lightweight design makes it suitable for older hardware, while its mature codebase and efficient resource utilization prioritize stability and reliability.  

Xfce edition of Linux Mint

The Xfce edition of Linux Mint presents a compelling option for users seeking a balance between efficiency and customization. It leverages the Xfce desktop environment, renowned for its lightweight nature and extensive customization capabilities.

It doesn’t support as many features as Cinnamon or MATE, but it’s extremely stable and very light on resource usage.

Technical Specifications of the Latest Version (as of February 28, 2024):

  • Xfce Version: 4.18 (as included in Linux Mint 21.3 “Virginia”)
  • Based on: GTK+ 3
  • Features:
    • Improved performance and stability
    • Enhanced support for HiDPI displays
    • Additional customization options

Characteristic features of Xfce Edition

Minimal Resource ConsumptionXfce prioritizes a minimal footprint, making it suitable for older or less powerful hardware. This translates to smooth operation even on systems with limited resources.
Extensive CustomizationXfce offers a surprising degree of customization. Users can personalize their desktops through themes, panels, and applets, tailoring the environment to their specific needs and workflows.
Mature CodebaseIt benefits from a mature codebase and extensive testing, contributing to its stability and reliability. This provides users with a dependable platform for everyday tasks and professional applications.
Familiar InterfaceWhile offering customization options, Xfce retains a familiar and user-friendly interface, making it approachable for users accustomed to traditional desktop environments.

The Xfce edition of Linux Mint caters to users seeking an efficient and customizable desktop experience. 

Its lightweight design makes it suitable for older hardware, while its mature codebase and extensive customization options empower users to adjust the environment according to their specific needs and preferences. 

A deep dive into specific use cases of Linux Mint

Linux Mint for beginners: While other beginner-friendly Linux distributions exist, Linux Mint’s combination of an intuitive interface, pre-installed applications, user-friendly installation, and extensive community support solidify its position as a highly suitable choice for users venturing into the world of Linux for the first time.

Linux Mint for developers: Linux Mint offers a comprehensive development environment, a robust and stable platform, and access to a wealth of open-source resources. These factors combine to make Linux Mint a compelling option for developers seeking a versatile and efficient development platform.

By leveraging the vast software repositories of Ubuntu, Linux Mint allows access to a wide range of additional development tools, libraries, and frameworks. 

Linux Mint for power users: While Linux Mint is renowned for its beginner-friendliness, it also offers valuable advantages for power users seeking a customizable and powerful operating system.

Users can customise themes, icons, layouts, keyboard shortcuts, and even system behavior through configuration files and tools. This level of control allows power users to tailor the system to their specific workflows and preferences.

Comparing Linux Mint to other distributions

FeatureFedoraUbuntuLinux Mint
Release ModelRolling ReleaseLong Term Support (LTS) with interim releasesBased on Ubuntu LTS, with additional updates
Package ManagementDNF (dnf)APT (apt)APT (apt)
Software AvailabilityAccess to latest software versionsFocus on stable releases, with older versions availableAccess to Ubuntu repositories, with additional curated packages
Desktop EnvironmentsGNOME, KDE Plasma, Xfce, and othersGNOME, KDE Plasma, Xfce, and othersCinnamon, MATE, Xfce
Target UsersDevelopers, early adopters, users seeking cutting-edge technologiesIndividuals, students, organizations seeking a stable and user-friendly experienceBeginners, individuals seeking a user-friendly experience with some flexibility
Community SupportStrong and active open-source communityLarge and active communityLarge and active community
FocusInnovation, bleeding-edge technologiesStability, ease of use, long-term supportUser-friendliness, stability, pre-installed applications

  • Package Management: All three distributions utilise user-friendly package managers, with DNF offering access to the latest software in Fedora, while APT in Ubuntu and Linux Mint focuses on stability and compatibility with available repositories.
  • Software Availability: Fedora prioritizes access to the latest software, while Ubuntu prioritizes stability and compatibility with readily available versions. Linux Mint provides access to Ubuntu’s repositories with additional curated packages, offering a broader selection while maintaining stability.
  • Desktop Environments: All three offer a variety of desktop environments, catering to user preferences for functionality and aesthetics.
  • Target Users: Fedora caters to users seeking cutting-edge technologies and may require more technical expertise. Ubuntu targets a broader audience, balancing user-friendliness with stability. Linux Mint prioritizes ease of use and a familiar experience for beginners and individuals seeking a user-friendly alternative to other operating systems.

Getting started with Linux Mint

Preparation:

  1. Download the ISO Image: Visit the official Linux Mint website (https://www.linuxmint.com/download.php) and download the desired edition’s ISO image. Choose an edition that aligns with your hardware specifications and preferences (e.g., Cinnamon, MATE, Xfce).
  2. Verify the Download: Ensure the downloaded ISO image integrity using a checksum tool like sha256sum and the checksum provided on the Linux Mint website. This verifies the file hasn’t been corrupted during download.
  3. Prepare Installation Media: Create bootable installation media using a program such as Etcher (https://etcher.balena.io/). This tool allows you to write the downloaded ISO image onto a USB flash drive or DVD.

Installation:

  1. Boot from Installation Media: Restart your computer and access the boot menu (typically by pressing F12, F2, or DEL during startup). Select the option to boot from your installation media (e.g., USB flash drive).
  2. Live Environment: The system will boot into a live environment, allowing you to try Linux Mint without affecting your existing operating system. This provides an opportunity to test compatibility and familiarise yourself with the desktop environment.
  3. Start Installation: Locate the installation icon on the desktop and launch the installation process.
  4. Installation Options: Follow the on-screen instructions, selecting your preferred language, keyboard layout, and partitioning scheme. It is recommended to choose the “Erase disk and install Linux Mint” option if installing on a new disk or wiping an existing installation. Advanced users may opt for manual partitioning.
  5. User Creation: Create a new user account, specifying a username, password, and choosing whether to make the user an administrator.
  6. Installation Completion: The installation process will begin, copying files and configuring the system. This may take some time depending on your hardware specifications.
  7. Reboot: Once the installation is complete, you will be prompted to restart your computer. Remove the installation media and press Enter to reboot.

Initial Configuration:

  1. Login: Upon reboot, login to your newly created user account using the credentials set during installation.
  2. Software Updates: Open the Software Updater application and install any available updates to ensure the system is running on the latest version. This improves security and stability.
  3. Explore the Desktop: Familiarize yourself with the desktop environment, including the application menu, taskbar, and available applications. Linux Mint comes pre-installed with essential software for everyday tasks, including web browsing, office productivity, and multimedia playback.

FAQs

 Is Windows 7 or Linux Mint better for an old PC?

In most cases, Linux Mint is a better choice for an old PC compared to Windows 7.

Advantages of Linux Mint:

  • Lightweight: Linux Mint is generally much lighter and resource-consuming than Windows 7. This translates to smoother performance and improved responsiveness on older hardware with limited RAM and processing power.
  • Security: Windows 7 is no longer officially supported by Microsoft, meaning it doesn’t receive security updates. This leaves your system vulnerable to security threats. In contrast, Linux Mint actively receives updates and security patches, offering improved protection.
  • Compatibility: Linux Mint works well with older hardware drivers, even if they are not actively supported anymore. This is because the Linux community often maintains drivers for older hardware.
  • Free and Open Source: Linux Mint is free to use and modify, eliminating the need for licensing costs, which can be a significant advantage, especially for older PCs that might not be used for business purposes.
How do you upgrade from Linux Mint Cinnamon to Ubuntu?

While it’s technically possible to upgrade from Linux Mint Cinnamon to Ubuntu, it is not recommended. Upgrading between different distributions with different package bases can lead to various challenges and potential system instability. 

Is switching to Linux Mint worth it?

Whether or not switching to Linux Mint is “worth it” depends heavily on your specific needs, preferences, and technical expertise. However, even if Linux Mint is not fulfilling your needs to the max, it is a free and open source OS, user-friendly, stable and secure platform, and is backed by a large and active community which makes it a valuable OS for beginners, professionals, as well as organizations. 

Linux Mint: User-friendly Open Source Operating System Read More »

Scroll to Top