To extract full use out of this bootstrap version of Anaconda, it’s important to learn how to install Miniconda Linux.
Miniconda is a free, minimal installer for conda, a cross-platform package manager specifically designed for Python and its associated scientific computing libraries.
Unlike Anaconda, the full-featured Python distribution, Miniconda focuses on providing the core functionality for environment and package management.
Benefits of Miniconda Linux
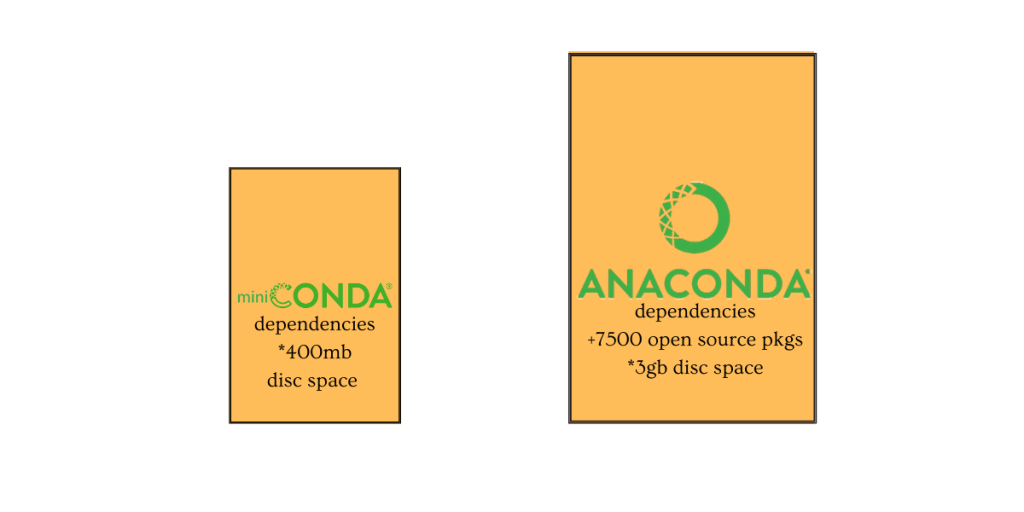
| Lightweight and Efficient | Miniconda offers a significant advantage in terms of disk space. It only includes conda, Python, and a few essential dependencies, resulting in a much smaller download and installation footprint compared to Anaconda. |
| Granular Package Control | Miniconda allows users to install only the specific packages required for their project. This avoids unnecessary clutter and potential conflicts that can arise with pre-installed packages in Anaconda. |
| Flexibility and Customization | It offers greater flexibility for creating isolated virtual environments. Each environment can have its own set of Python versions and packages, ensuring project-specific dependencies are met without affecting other projects on the system. This level of customization is crucial for managing complex workflows and maintaining compatibility across different projects. |
| Compatibility with Conda Ecosystem | Although it lacks pre-installed packages, Miniconda leverages the extensive conda package repository. Users can leverage the conda install command to access thousands of scientific, data analysis, and machine learning packages, providing a rich ecosystem for building diverse Python environments. |
| Integration with Pip | While conda excels at managing dependencies, Miniconda still integrates with pip, the standard Python package installer. Users can leverage pip for additional Python-specific packages that may not be available in the conda ecosystem. |
Miniconda is compatible with Windows, macOS, and Linux. However, the steps of installation are different. This guide will exclusively focus on how to install Miniconda on a Linux system.
Download & Install Miniconda Linux
Before we get to the installation of Miniconda on Linux, it’s pertinent to understand the difference between a 64-bit and a 32-bit system.
The core difference between 32-bit and 64-bit systems lies in how they handle data and memory.
A 64-bit system can process data in 64-bit chunks because it has 64-bit memory addresses. This allows it to handle more complex calculations, work with significantly larger datasets faster, and utilise more random-access memory (RAM).
On the other hand, a 32-bit system can only process data in 32-bit chunks at a time. This restricts its ability to handle complex calculations or work with large datasets efficiently due to limited addressable memory space.
Almost all modern computers use a 64-bit system, but if you are unsure about your system’s architecture, search for it according to the instructions provided online.
On a Linux system, simply typing the word ‘arch’ in the terminal will display the architecture of the system. Whereas on a Windows system, click on the Start button, then select Settings > System > About. On the right side of the pop up, under device specifications, look for System type.
For e.g. , if you run arch and the output is x86_64, it means you have a 64-bit processor.
| Feature | 32-bit System | 64-bit System |
| Data Handling | 32-bit chunks | 64-bit chunks |
| Memory Addressing (max) | 4GB | 18 Quintillion bytes |
| Suitability for Memory-intensive Applications | Lower | Higher |
Choosing between 64-bit and 32-bit:
In almost all modern scenarios, a 64-bit system is preferable. It offers superior performance, especially when dealing with large datasets or memory-intensive applications.
However, there might be a few rare cases where a 32-bit system could still be relevant:
- Running very old software: Some extremely old software might only be compatible with 32-bit systems.
- Limited system resources: If you have a very old computer with minimal RAM (less than 4GB), a 32-bit system might make better use of those resources.
For most users, though, a 64-bit system is the clear choice for its improved performance and wider software compatibility.
To download Miniconda for Linux, click here.
Install Miniconda Linux – The complete process
After successfully downloading Miniconda, open the terminal window to install it. With the help of the terminal window, a user can interact with their system by typing different commands.
Use the cd command to navigate to the directory where you want to download the installer. A directory is like a folder that holds files on your computer. The cd command lets you change between folders.
For example, if you want to download it to your Downloads directory, you might use:
Once downloaded (and optionally verified), use cd again to navigate to the directory containing the downloaded installer script (e.g., Miniconda3-latest-Linux-x86_64.sh).
Then, to run the script and initiate the installation, type:
Replace filename.sh with the actual filename of your downloaded installer.
Follow the on-screen prompts during the installation and if you are unsure about any setting then accept the defaults.
Installation prompts are messages that ask you questions during the setup process. Accepting the defaults means using the pre-selected options, which are usually fine for most users.
Install Miniconda Linux – Verifying installation
Here are two ways to verify if Miniconda is successfully installed on your Linux system:
Method 1: Using the conda command:
- Open a terminal window.
- Type the following command and press Enter:
If Miniconda is installed correctly, this command will display a list of currently installed packages in the base environment (which might be minimal by default with Miniconda).
Method 2: Checking the conda path:
- Open a terminal window.
- Type the following command and press Enter:
This command searches for the conda executable in your system PATH.
If Miniconda is installed and added to your PATH during installation (which might be the default behaviour), the command will output the directory path where the conda executable resides (e.g., /path/to/miniconda/bin/conda).
If neither of these methods work, it’s possible Miniconda wasn’t installed correctly or wasn’t added to your PATH.
You can try reinstalling Miniconda following the official instructions [anaconda miniconda download] and ensuring the PATH gets updated during installation.
How to install Miniconda on Linux? A summary
Installing Miniconda on Linux involves these key steps:
- Download the installer: Get the appropriate installer from the Anaconda website [anaconda miniconda download].
- Verify installer hash (optional): Download the checksum file (if offered) and use sha256sum or gpg to verify the installer hasn’t been corrupted.
- Run the installer script: Use bash to execute the downloaded installer script (e.g., bash filename.sh). Follow the on-screen prompts.
- Add conda to PATH (optional): Edit your shell configuration file (e.g., .bashrc) and add the Miniconda bin directory to your system PATH for easier access.
Optionally, you can verify the installation by running Conda list in a terminal window. This should display the installed packages if Miniconda is set up correctly.
Benefits of Conda
| Effortless environment management | Create isolated environments for different projects, ensuring each one has the specific package versions it needs without conflicts. |
| Rich Package Ecosystem | Access a vast repository of scientific packages for data analysis, machine learning, and more, all through the convenient Conda install command. |
| Seamless Dependency Resolution | No more wrestling with dependency issues! Conda intelligently resolves dependencies between packages, ensuring everything works together smoothly. |
| Enhanced Reproducibility | Easily recreate your project’s environment by sharing the Conda environment file, allowing others to run your code with identical dependencies. |
- You may also be interested to read : How To Reboot Linux Through Graphical User Interface & Command Line