Teams is a cloud-based communication and collaboration platform developed by Microsoft. Designed for the modern workplace, it boosts features like chat, video conferencing, file storage, and application integration within a single interface. Let’s Explore more in this Microsoft Teams User Guide.
Benefits of Microsoft Teams App
| Centralized Communication | Teams offers a central hub for communication, fostering real-time chat interactions, group discussions via channels, and video conferencing capabilities. |
| Enhanced Collaboration | File sharing, co-authoring documents within integrated applications like Microsoft Office 365, and task management tools streamline teamwork and project execution. |
| Improved Productivity | Centralized information access, threaded conversations, and searchable chat history reduce communication overhead and enhance information retrieval. |
| Scalability and Security | Teams offers secure communication channels with user access controls, making it suitable for organizations of all sizes. |
| Third-Party Integration | An extensive library of third-party applications integrate seamlessly with Teams, extending its functionality to cater to specific industry needs. |
Uses of Microsoft Teams App
| Virtual Meetings and Team Huddles | Host secure video conferences with screen sharing, presentations, and real-time captions for improved accessibility. |
| Project Management and Communication | Create project-specific channels for focused discussions, file sharing, and task allocation with integrated to-do lists. |
| Remote Work Collaboration | Facilitate seamless communication and teamwork for geographically dispersed teams. |
| Customer Relationship Management | Engage with clients directly through Teams calls and chats, facilitating personalized communication and support. |
| Internal Communication and Knowledge Sharing | Create company-wide channels or private groups for announcements, discussions, and knowledge base creation. |
Alternatives to Microsoft Teams
For the longest time possible, Microsoft teams single handedly dominated the world of digital communication. But with the passage of time, newer alternatives to Teams have made their way into the digital market. Some of the widely used options are:
- Slack: A popular chat-based collaboration platform offering integrations with various third-party tools.
- Google Meet: A video conferencing solution from Google tightly integrated with the G Suite of productivity applications.
- Zoom: A widely used video conferencing platform offering a free tier and paid plans with advanced features.
- Cisco Webex: A comprehensive collaboration suite encompassing video conferencing, file sharing, and project management functionalities.
Despite the availability of multiple options, Microsoft Teams offers a robust and versatile platform for communication and collaboration, making it a valuable tool for modern organizations.
Microsoft Teams Download
The process of downloading Microsoft Teams app on a desktop is different from that of downloading it on a mobile phone.
Following is a user guide of Microsoft Teams that will simplify the process of downloading and using the Teams app.
Microsoft Teams download on a mobile:
Install the Teams app from the Apple App Store for iOS devices or Google Play Store for Android devices.
Click on the 3 dots from the drop down menu and then select ‘download the mobile app’ option.
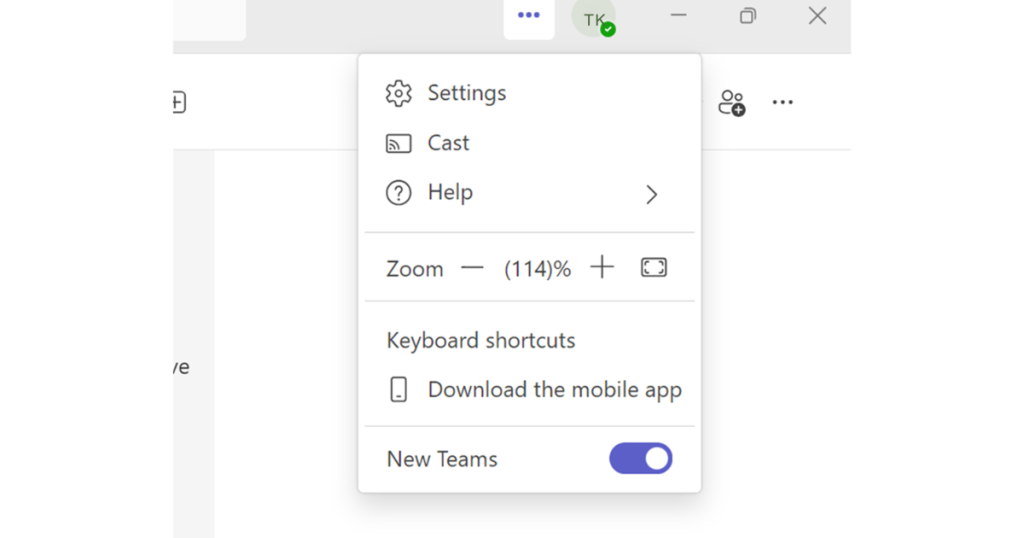
When you click on ‘download the mobile app’ option, a QR code will pop up. You need to scan it with your mobile phone after which it will automatically download the Microsoft Teams app on your phone.
After successfully downloading you can use the app by signing into the app.
This concludes the process of downloading the Microsoft Teams app.
How to create a channel or Team:
Creating a Team:
- Access Teams Menu: Launch the Microsoft Teams application and navigate to the “Teams” section on the left panel.
- Initiate Team Creation: Click the “+” icon located at the top of the teams list to initiate team creation.
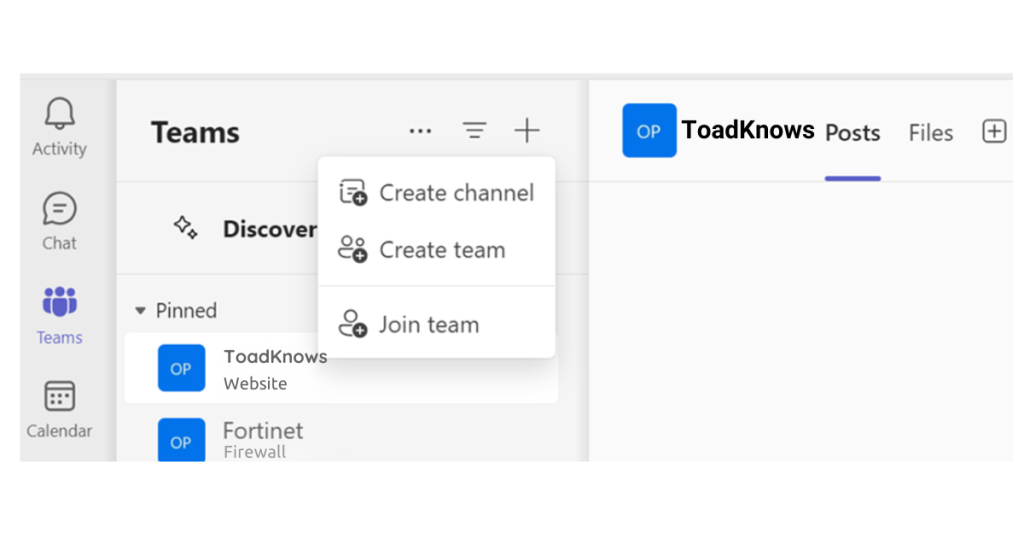
- Team Type Selection: Choose between “From scratch” for a new team or “Build from a group” if leveraging an existing Office 365 group.
- Team Configuration: Define the team’s privacy level (Public for open access or Private for specific members) and provide a descriptive name. Optionally, include a team description for clarity.
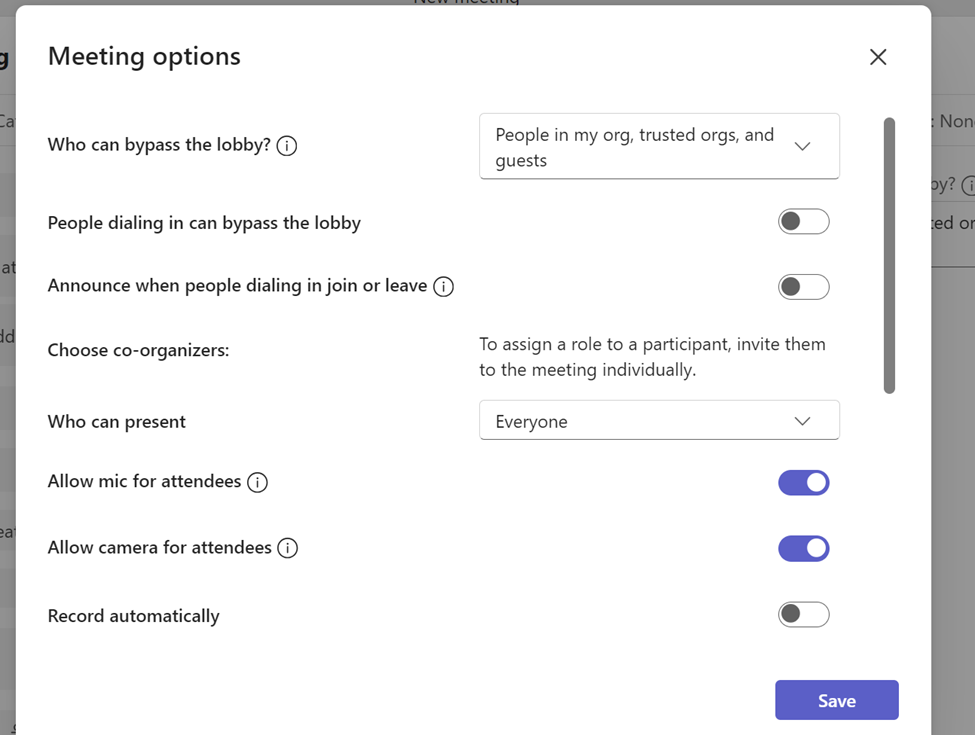
- Member Addition: Add members by typing their email addresses and selecting them from the search results.
- Team Creation: Once configuration is complete, click “Create” to establish the team.
You can also create a new meeting through the calendar.

Click on the ‘new meeting’ icon on the top right corner of the screen. Following pop-up will appear after clicking on the ‘new meeting’ option:
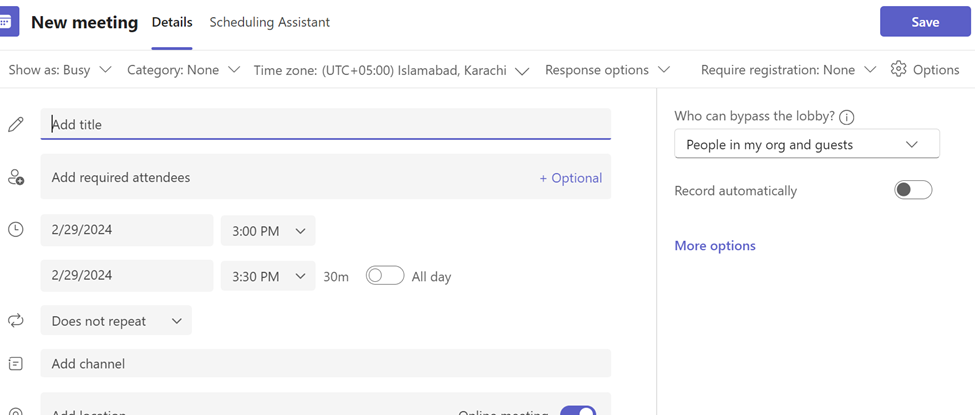
Fill in the required details and save them to create a new team.
Creating a Channel:
- Navigate to Target Team: Within the Teams application, select the desired team you want to add a channel to.
- Access Channel Management: Click the three dots “…” next to the team name and choose “Manage team” from the menu. Alternatively, right-click the team name and select “Manage team.”
- Channel Creation: Locate the “Channels” tab within the team management window and click the “+” icon to initiate channel creation.
- Channel Configuration: Provide a unique and descriptive name for the channel. Optionally, include a channel description outlining its purpose.
- Privacy Selection: Choose the channel’s privacy level (Standard for all team members or Private for designated members).
- Channel Creation: Click “Create” to establish the channel within the selected team.
Sharing OneDrive documents by Teams:
There are two primary methods for sharing OneDrive documents within Microsoft Teams:
Method 1: Sharing via Chat
- Initiate Chat: Navigate to the “Chat” section within the Teams application and open the chat conversation where you want to share the document.
- Attach the File: Click the “Attach” icon (paperclip symbol) located beneath the chat compose box.
- Select OneDrive Location: Choose “OneDrive” from the available options to access your OneDrive storage.
- Locate and Select File: Browse your OneDrive folders and select the document you intend to share.
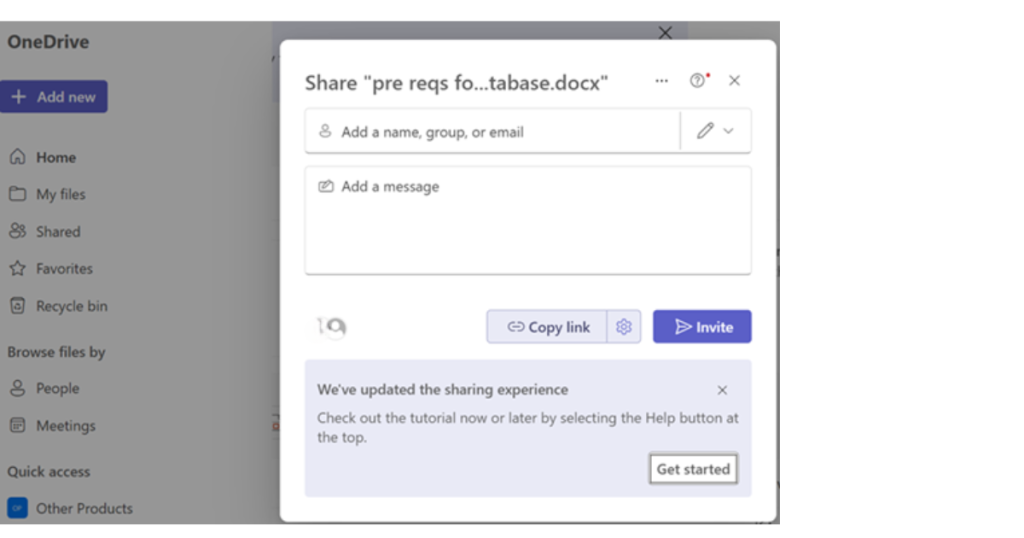
- Sharing Options (Optional): Click the three dots “…” next to the file name to access sharing options. Here, you can choose to either “Share” (providing view/edit access based on your OneDrive settings) or “Open in Teams” (opening the document within the Teams chat for real-time collaboration).
- Send the Chat: Once you’ve selected the desired file and sharing option, click the “Send” button to share the document within the chat conversation.
You can also initiate a voice or video call with a member through the chat option. Click on the ‘phone’ icon on the top right corner of the chat.
You can explore more advanced options by clicking on the ‘three dots’ in the top right corner of the chat, in the same line as the phone icon.
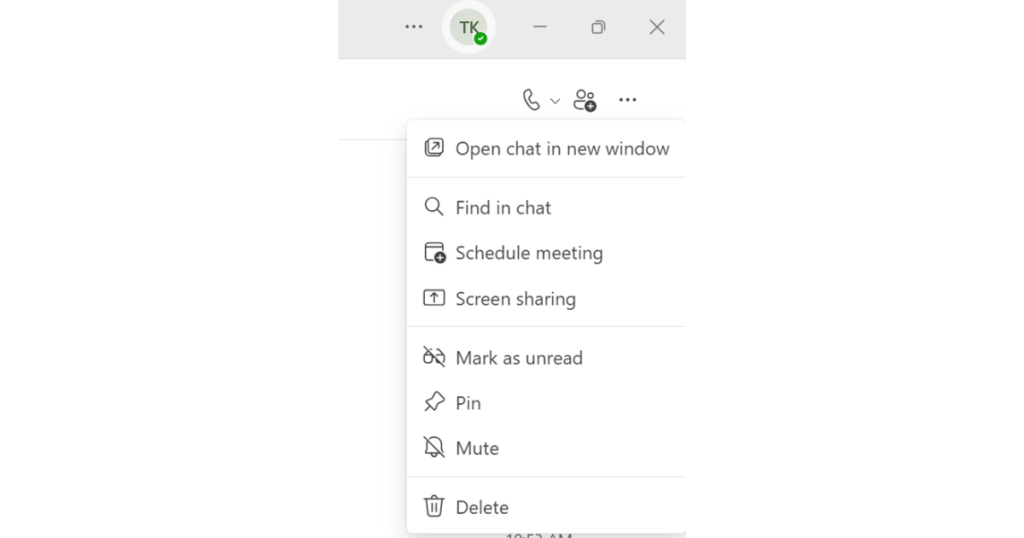
From here you can share your screen OR schedule a meeting for later.
This how chat box will look like :
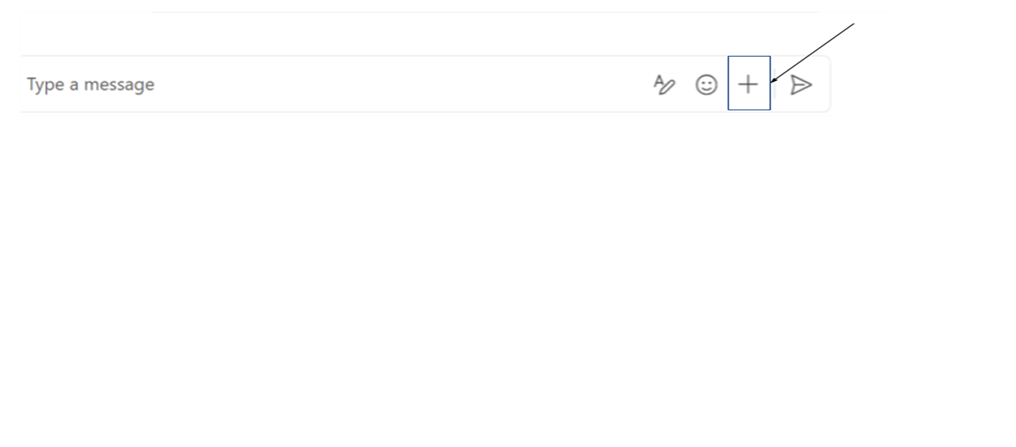
Below options will pop up when you click on the ‘ + ‘ icon :
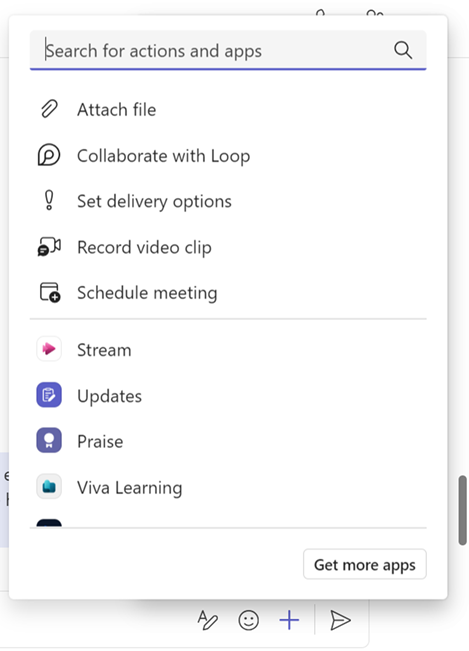
Method 2: Sharing via Teams Channels
- Access the Target Team: Within the Teams application, navigate to the specific team containing the channel where you want to share the document.
- Open the Channel: Select the desired channel from the list displayed under the team name.
- Upload or Share Option: Click the “+” icon located next to the channel name and choose either “Upload file” to directly upload a document from your computer or “Browse in OneDrive” to access your OneDrive storage.
- Locate and Select File: If selecting “Browse in OneDrive,” navigate through your folders and choose the document you want to share.
- Sharing Options (Optional): Similar to the chat method, you can access sharing options by clicking the three dots “…” next to the file name. This allows you to define access permissions for the document within the channel.
- Add a Description (Optional): Optionally, you can add a brief description about the document within the channel message for better context.
- Post to Channel: Click the “Post” button to share the document within the selected Teams channel.
How to add a member that’s not a part of your organization:
Click on the Teams icon to open the sidebar.
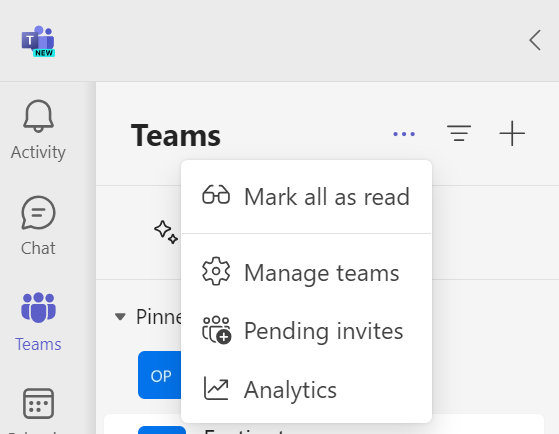
From there, click on manage teams. You will now come across the following pop up:
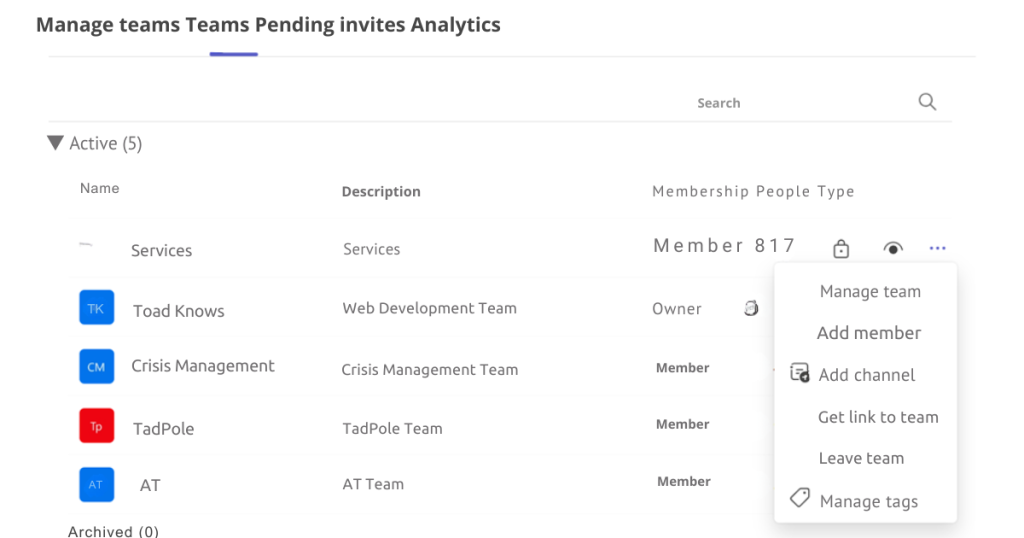
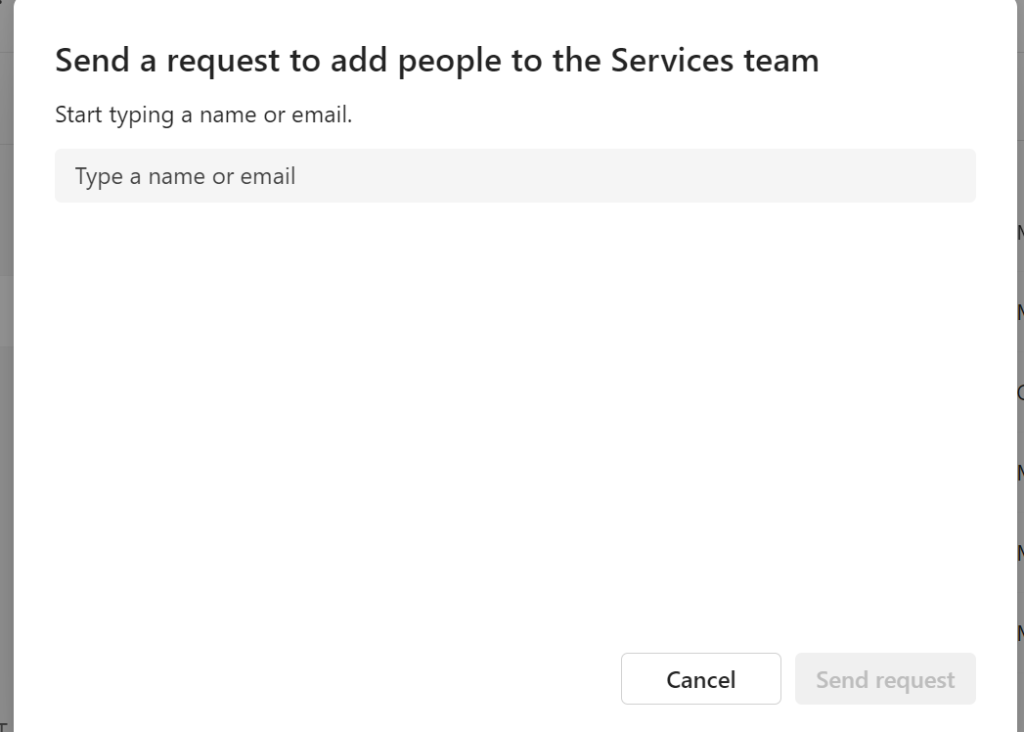
Click on 3 dots and select add member by entering the email address of the guest.
By understanding how to create teams, channels, and leverage apps, you can effectively utilize Microsoft Teams to streamline communication, collaboration, and process automation within your organization.
You may also be interested to read : Microsoft Teams App – Cloud-Based Communication Platform
FAQs
Can I download Microsoft Teams for free?
Yes, you can download Microsoft Teams for free. There’s a free version available for personal use called “Microsoft Teams (free)”. It offers features like unlimited chat, file sharing, video calls for up to 60 minutes with up to 100 participants, and 5GB of cloud storage.
To download it, you can visit the official Microsoft Teams download page [Microsoft Teams download]. You’ll need a Microsoft account to sign up for the free version
Do I need to install Teams to join a meeting?
No, you don’t necessarily need to install Teams to join a meeting. There are two ways to join a Teams meeting:
- Join on the web: If you click on a Teams meeting link, you’ll usually be given the option to “Join on the web” instead of downloading the app. This will launch a web version of Teams in your browser (Microsoft Edge or Google Chrome are currently supported). You may be prompted to allow Teams to use your microphone and camera.
- Join with the app: If you already have Teams installed, you can also click the link and it will automatically open the meeting in the app. This can offer a more feature-rich experience than the web version.

